
UVK Help - Options


You can access this section by clicking Options, in the Welcome screen.
Content index:
Overview of the "Options" section
Press the Cloud Sync button to configure automatic syncing of settings, whitelists and scripts to/from the cloud.
If you are a licensed user, you will also be able to save the settings to a ini file, which will be loaded by the UVK packages upon instal. The settings saved to the ini file will automatically be loaded by the UVK packages.
Click Save to file to export the current UVK settings to a ini file. Placing the created ini file in the same path as the UVK packages will make them automatically write the settings from the ini file to the registry. This includes the UVK running protection password, the UVK preferences and settings, and the lists columns width. This feature is only available for the users who bought the UVK branding key.
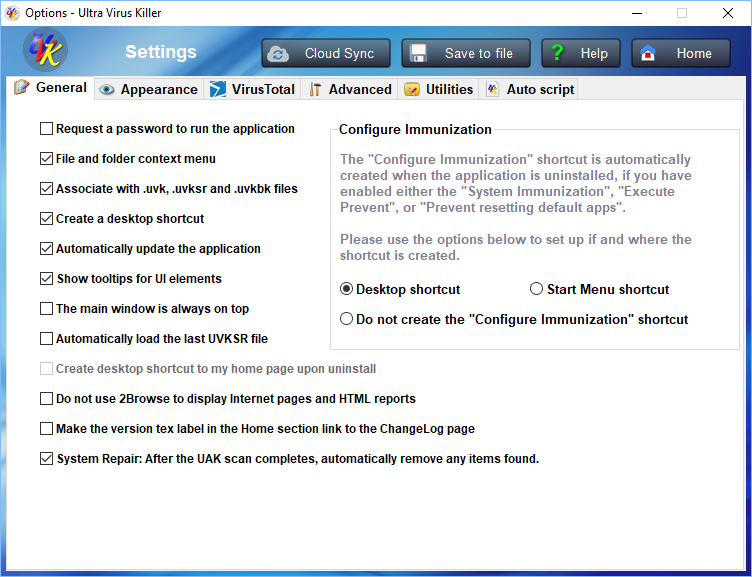
General tab
This tab allows you to set general application settings. All changes are applied on the fly, as you tick or un-tick the check boxes.
![]() Request a password to run the application:
This feature is only available to registered users. It allows you to set a password to be asked everytime UVK is
launched.
Request a password to run the application:
This feature is only available to registered users. It allows you to set a password to be asked everytime UVK is
launched.
![]() File and folder context menu:
If you uncheck this
option, the Force Delete
and File information context menu
options will be
deleted and you will no longer be able to get information or delete files or folders
from the Windows explorer using this feature.
File and folder context menu:
If you uncheck this
option, the Force Delete
and File information context menu
options will be
deleted and you will no longer be able to get information or delete files or folders
from the Windows explorer using this feature.
![]() Associate with .uvk
.uvksr and .uvkbk files: This option controls whether the
file associations for UVK scripts (.UVK), System repair settings
files (.UVKSR) and Backup files (.UVKBK) are created and those file
types associated with the applicaiton.
Associate with .uvk
.uvksr and .uvkbk files: This option controls whether the
file associations for UVK scripts (.UVK), System repair settings
files (.UVKSR) and Backup files (.UVKBK) are created and those file
types associated with the applicaiton.
![]() Create a desktop shortcut:
Whether to have a shortcut to UVK's executable on
the current user's desktop.
Create a desktop shortcut:
Whether to have a shortcut to UVK's executable on
the current user's desktop.
![]() Automatically update the application: This option controls
whether UVK should automatically search for updates when it is
launched. The process will be performed in the background, so the
launch time will not be affected. If a new version is available, you
will be notified, and provided with the option to upgrade.
Automatically update the application: This option controls
whether UVK should automatically search for updates when it is
launched. The process will be performed in the background, so the
launch time will not be affected. If a new version is available, you
will be notified, and provided with the option to upgrade.
![]() Show tooltips for UI elements: Enable or
disable displaying tooltips on mouse overed controls.
Show tooltips for UI elements: Enable or
disable displaying tooltips on mouse overed controls.
![]() The main window is always on top: Enable or
disable top most attributes for UVK's main window.
The main window is always on top: Enable or
disable top most attributes for UVK's main window.
![]() Automatically load the last UVKSR file: When this option is enabled UVK
will automatically load the last System repair settings file (if any) when
you go tho the System repair section.
Automatically load the last UVKSR file: When this option is enabled UVK
will automatically load the last System repair settings file (if any) when
you go tho the System repair section.
![]() Create desktop shortcut to my homepage upon uninstall: This
feature is only available to registered users. If this option is
enabled, a desktop internet shortcut pointing to your website is
automatically created when the application is uninstalled.
Create desktop shortcut to my homepage upon uninstall: This
feature is only available to registered users. If this option is
enabled, a desktop internet shortcut pointing to your website is
automatically created when the application is uninstalled.
![]() Do
not use 2Browse to display Internet pages and HTML reports: By
default, UVK uses 2Browse to display Internet pages, such as this
one, and HTML logs, such as the System info or the VirusTotal
reports. Check this option if you prefer to use the default internet
browser instead.
Do
not use 2Browse to display Internet pages and HTML reports: By
default, UVK uses 2Browse to display Internet pages, such as this
one, and HTML logs, such as the System info or the VirusTotal
reports. Check this option if you prefer to use the default internet
browser instead.
![]() Make
the version text label in the Home section link to the ChangeLog
page: If this option is enabled, clicking the text label in the
top right of the Home section will take you to the
Change log web page.
Make
the version text label in the Home section link to the ChangeLog
page: If this option is enabled, clicking the text label in the
top right of the Home section will take you to the
Change log web page.
![]() System Repair: After the UAK scan completes, automatically remove
any items found: If you enable this option, the Ultra Adware
Killer scan, when launched from the System repair section will be
completely automated. Any "checked" items are automatically removed,
and UAK is closed after the removal. Note that this will not allow
you to check for false positives, so use this feature at your own
risk.
System Repair: After the UAK scan completes, automatically remove
any items found: If you enable this option, the Ultra Adware
Killer scan, when launched from the System repair section will be
completely automated. Any "checked" items are automatically removed,
and UAK is closed after the removal. Note that this will not allow
you to check for false positives, so use this feature at your own
risk.
Configure Immunization
This feature helps you to set if and where the Configure Immunization shortcut is to be created when you uninstall the application. By default, this shortcut is automatically created in the common desktop folder. The shortcut is created only if you do not choose to do a clean uninstall, and one of the following conditions meet:
- At least one System Immunization area is immunized.
- At least one Execute prevent path is set.
- You have blocked at least one app with Stop resetting my apps.
Select Desktop shortcut, or Start menu shortcut, according to the location where you wnat the shortcut to be created, or Do not create the "Configure Immunization" shortcut, if you not want to create a shortcut at all. Keep in mind that, if you choose this option, you will need to re-install the application to make changes to the System Immunization, Execute prevent or Stop resetting my apps.
Apearence tab
This tab allows you to easily change the colors of the application's user interface, making it look exactly the way you like.
Currently, the only available option is to change the skin. Select the desired skin from the dropdown box and press Apply skin. Changes are immediately applied.
VirusTotal tab
This tab allows you to configure several options related to the way VirusTotal reports are displayed in the Process Manager, Memory modules manager, Autorun manager, Service manager and Smart uninstaller lists.
![]() Automatically start VirusTotal analysis: When this option is
enabled, the VirusTotal analysis of the files and URLs in the list
is automatically started as soon as the list is created.
Automatically start VirusTotal analysis: When this option is
enabled, the VirusTotal analysis of the files and URLs in the list
is automatically started as soon as the list is created.
![]() Automatically upload unknown items to VirusTotal: When this
option is enabled, files that are not yet present in VirusTotal's
database yet are automatically uploaded, so they are aded to VT's
database. We recommend you leave this option enabled, not only to
improve the security of the analysis of your machine, but also to
improve VirusTotal's database.
Automatically upload unknown items to VirusTotal: When this
option is enabled, files that are not yet present in VirusTotal's
database yet are automatically uploaded, so they are aded to VT's
database. We recommend you leave this option enabled, not only to
improve the security of the analysis of your machine, but also to
improve VirusTotal's database.
![]() Show the "VirusTotal analysis" progress dialog box. When this
option is enabled, a small dialog box is displayed in the top left
corner of the desktop, indicating the progress of the VirusTotal
analysis operation. Othewise, the operation is silently performed in
a background thread.
Show the "VirusTotal analysis" progress dialog box. When this
option is enabled, a small dialog box is displayed in the top left
corner of the desktop, indicating the progress of the VirusTotal
analysis operation. Othewise, the operation is silently performed in
a background thread.
You can set a threshold value that defines up until how many detections a file scanned with VirusTotal should be considered safe. VirusTotal scans files with more than 50 AntiVirus programs. If only one or two of those detect the file as malware, we consider it a false positive.
However, we leave that evaluation up to you. Enter the desired threshold value in the input box, or use the up/down arrows to the right to increase/decrease it. Changes are instantly applied.
Advanced tab
Help buttons behavior
By default, when you click a Help button, UVK will take you to the help page corresponding to the section you are working on. For instance, if you are working in the Options section, clicking the Help button will bring you to this page.
However, that may not be the action you want. I.E. if you own a branding license you may not want to give away the true origin of the application. That's whay UVK provides you with options to control the action to take when you press the Help buttons.
![]() Go to the help page of the section I'm working on: This is
the default behavior, as explained above.
Go to the help page of the section I'm working on: This is
the default behavior, as explained above.
![]() Go to the main help page, which contains links to all the help
pages: If this option is enabled, clicking any help button will
take you to the main Help page.
Go to the main help page, which contains links to all the help
pages: If this option is enabled, clicking any help button will
take you to the main Help page.
![]() Go to my website page: This option is only available to users
having a Branding license,
because this license type has an associated website, which ckicking
the Help buttons takes you to.
Go to my website page: This option is only available to users
having a Branding license,
because this license type has an associated website, which ckicking
the Help buttons takes you to.
Third party folder options
This feature allows you to set up where you want UVK to download third party applications to. End users usually don't need this feature. It's specially useful when UVK is installed from a USB drive or a network location, because in that case you can tell UVK to download third party software to that location instead.
The default option is Use the default path (a sub-directory of the install folder). Use this option if you don't know what to choose.
The Make the Third Party folder be the same as %InstallSourceDir% option will make UVK use the same folder where the UVK package that was used to install the application resides. For instance, if you installed UVK from E:\UVKPortable.exe, this option will make UVK download third party tools to E:\.
You can also tell UVK to use a custom directory as the ThirdParty folder. In this case, select Use the custom path below. You can use environment variables so the path remains valid in other computers. UVK will then download third party tools to the directory you specify.
Utilities tab
This app contains shortcuts to utilities related to the application itself.
![]() Command line help: Learn or review the application's
supported command line switches.
Command line help: Learn or review the application's
supported command line switches.
![]() Create script: Launch the Log
analyzer, so you can quickly create a UVK script.
Create script: Launch the Log
analyzer, so you can quickly create a UVK script.
![]() Check for updates: Check if a newer version of the
application is available for download.
Check for updates: Check if a newer version of the
application is available for download.
![]() Report a bug: This link takes you to the
comment/bug reporting page.
Report a bug: This link takes you to the
comment/bug reporting page.
![]() View application log: View the report of the actions taken
with the application.
View application log: View the report of the actions taken
with the application.
![]() Download scripts: This link takes you to
UVK's script collection page.
Download scripts: This link takes you to
UVK's script collection page.
![]() Create SFX package: This feature allows you to create a self
installing package containing UVK's required files, your license
activation files, settings, scripts and any other files you may
need. For more information please visit the
dedicated help page.
Create SFX package: This feature allows you to create a self
installing package containing UVK's required files, your license
activation files, settings, scripts and any other files you may
need. For more information please visit the
dedicated help page.
![]() View last SFC logs: View details about the latest System File
Checker (SFC) operations.
View last SFC logs: View details about the latest System File
Checker (SFC) operations.
![]() View last DISM logs: View details about the latest Deployment
Image Servicing and Management (DISM) operations.
View last DISM logs: View details about the latest Deployment
Image Servicing and Management (DISM) operations.
Auto script tab
This tab allows you to configure up to three actions that the application will automatically carry on when it is normally launched. You can make it automatically run a UVK script, load a System Repair Settings file, and run a specific command.
This feature was built to be intuitive. Normally you start by setting up the path of the file to be executed, int the corresponding field. You can use the Browse button to the right of each field to locate the file using the Windows shell. Also, all three fields support drag & drop.
Because you don't know how many times you will launch UVK, you may not want to run the commands each time you launch the application. So this feature also allows you to specify the number of interval days between each run. Tick the Limit to once every checkbox in the desired group, and then enter the desired days interval in the input box. If the corresponding command has already been executed, it will not be again until that number of days has passed.
The AutoLoad feature also allows you to set the UI (user interface) mode for each command. For the UVK script and the UVKSR file, choosing the Passive mode will make UVK show only progress information, choosing the Quiet mode will not show any UI. For the specific command, choosing the Hidden UI mode will make UVK try to hide any windows created by the command's process. You should not use this mode for commands that expect user input.
If you want to reset all fields to their defaults, press the Clear all button.
If you want to check out if the commands are working properly before saving, press Test all.
when you're done setting up your commands, press Save all. This will save the changes for the current computer. If you want to save the changes for use in other computers, you can CloudSync them, or export them to UVKSettings.ini.
