
Clear Disk Info


Clear Disk Info is a free software program that provides a clear view of health related information about connected storage devices. Keeping an eye on storage devices is essential when you work with computer systems.
A storage device failure could lead to data loss or corruption of system files that prevent certain functionality or the system from booting at all. This tools supports S.M.A.R.T. monitoring, NVMe health log and USB connected devices. Unlike most tools of the same kind, Clear Disk Info displays the information in a human readable, user friendly way.
A Clear Disk Info license lets you enable automatic disk monitoring, so you can receive alerts in case one of your storage device is degrading.
Download Clear Disk Info Buy license
Current version: 4.4.1.0. File size: 934.27 KB. Change log
By downloading and using this program, you declare to have read and agree with the End User License Agreement for our software.
Click here to view the change log from the latest builds.
If you like this program and want to support its future development, you can donate by clicking the button below. Thanks in advance. Any amount is appreciated.
Help content index
Application interface
Even though it is not visible in the picture below, the right pane list has a fifth column showing a description of each item.
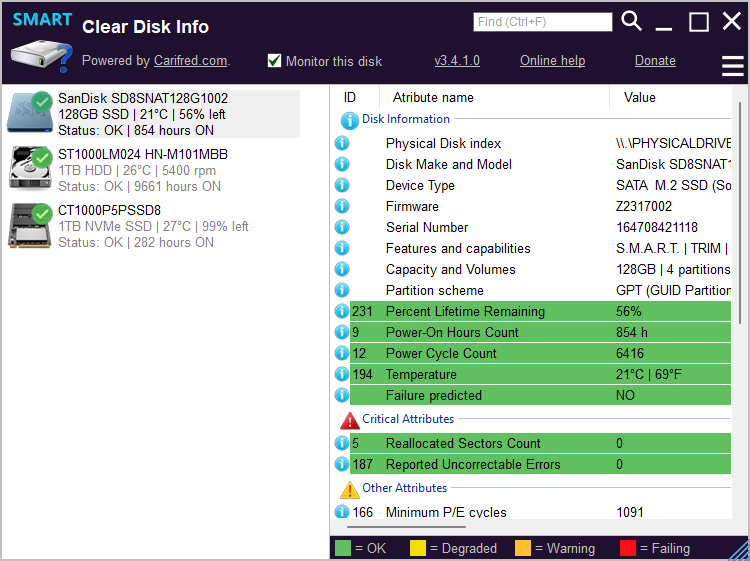
The list of disks is displayed in the left pane, where you can have a quick insight on the health and statistics from all your disks. The right pane contains information on the selected disk. The first disk (disk 0) is selected by default. To view information about a different disk, just select it in the left pane. More information here.
Whenever you need more options, press the menu button at the top right side of the UI. More information here.
Overview of Clear Disk Info
Clear Disk Info is a storage device diagnosis utility. It displays some basic information about the selected disk, and also S.M.A.R.T./health information. Clear Disk Info supports hard disk drives (HDD), solid state drives (SSD) and also the most recent NVMe SSDs.
The main reason why we created Clear Disk Info is that most existing tools of this kind display the S.M.A.R.T. attributes in a raw way, and in order for us to understand them we have to go digging over the internet. And even after that, in most cases we're not sure if the relevant data is the Raw Value or the Current value, or both, or whether the Threshold value is meaningful in each line.
Often, we have to make complicated arithmetic operations to calculate whether an attribute is below the threshold. This is where Clear Disk Info comes in handy, because it performs those calculations automatically for you.
Clear Disk Info displays only the actual, meaningful value in the one column, the ideal value in the next column, and also a description of that attribute. This way we don't need to go online searching for instructions or perform complicated operations because everything is already there.
Clear Disk Info can display some information about pen drives and SD cards connected through USB ports, but the amount of information that can be retrieved through the adapter is usually limited.
Clear Disk Info is fully portable and standalone. You do not need to install it before being able to run it, and the whole application only contains one file.
Analyzing disk information
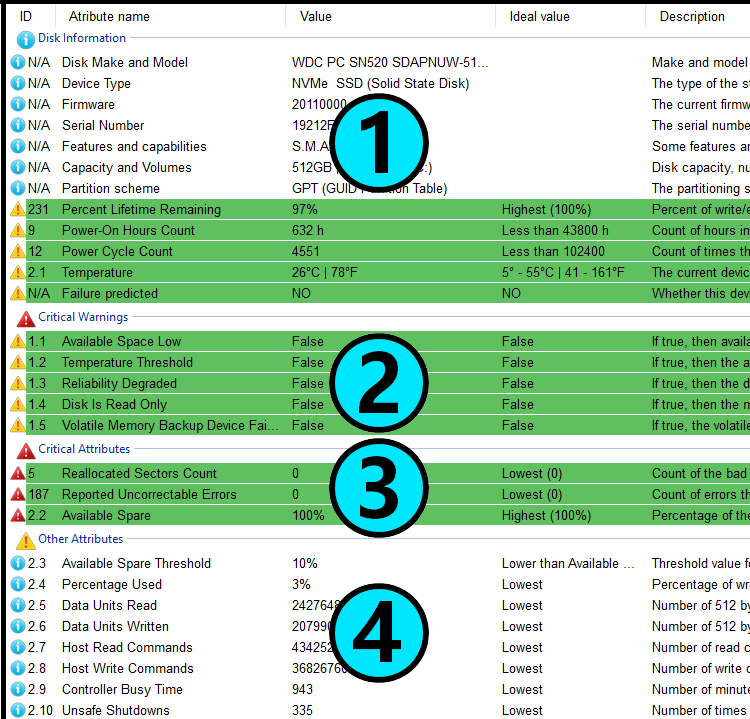
The list that displays disk information and SMART/health data is divided in four groups.
The first group, named Disk information shows some of the most important health attributes, such as power-on hour count, temperature and percent lifetime remaining (for SSDs). This group also shows device information such as the model, serial number and rotation rate (for HDDs), disk partitioning and some other useful informatioin.
The second group dsiplays the critical warnings from the Nvme health log. These attributes have only two possible values, True or False. Monitoring these atttributes is very important as it may help you to prevent damage to your device or data loss. This group is only visible if the selected disk is a NVMe SSD.
The third group shows the SMART critical attributes, according to several sources such as Wikipedia and Kingston, among others. When these attributes go out of mormal values, usually predict device faillure. If you see yellow or red collored items here, start backing up your data regularly. On the other hand if you see several red collored items here, think of replacing your drive with a new one.
The fourth group shows other attributes that may help you diagnose problems with your drive, or decide whether you should replace it.
Menu options
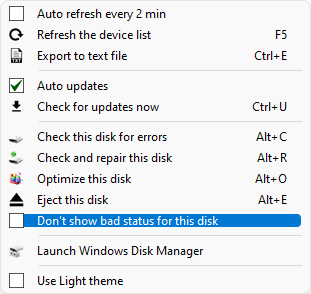
You can access this menu by pressing the 'three bar button at the top right corner of the UI, or by right clicking any item in any of the lists.. A menu similar to the picture above is then displayed with the following options:
Auto refresh every 2 min - This menu item turns the auto-refreshing mode on or off. When this option is enabled, Clear Disk Info automatically reloads the information for all disks every 2 minutes
Refresh the device list - Press this menu item or the F5 key whenever you want to reload the disk information for all disks.
Export to text file - Save the selected disk's information to a text file. You will be asked to provide the location and file name of the desired text file.
Auto updates - This turns auto-updating on or off. When this option is enabled, the application searches for a newer version everytime it is launched.
Check for updates now - Click this menu item if you want Clear Disk Info to quickly verify if an update is available, and update, if it is.
Execute self test - Click this menu item to send a command to the selected disk, asking it to start a self test.
Check this disk for errors - Click this menu item to easily run the Windows disk checking utility (chkdsk /F) on each partition of the selected disk. The option to search for and repair damaged blocks is disabled.
Check and repair this disk Select this menu item to easily run the Windows disk checking utility (chkdsk /F /R) on each partition of the selected disk. The option to search for and repair damaged blocks is enabled, so the scan and repair operation can take long.
Optimize this disk - Select this menu item if you want to optimize the storage layout of the selected disk. This will trim SSD disks, or defrag HDD drives.
Eject this disk - Click this menu item if you want to safely remove a disk without shutting your computer down. This may even work for some SATA connected devices if they are not being used by other applications.
Don't show bad status for this disk - Enable this option to prevent the selected disk from be marked with the Warning or the Failing status, regardless of what the S.M.A.R.T. attributes's values are. You can disable this feature again anytime later. This is a per-disk feature.
Launch Windows Disk Manager - This menu item lets to open the Windows built-in Disk Management utility.
Use the light/dark theme - Click this menu item to switch between the dark and the light theme.
About / Activation - This menu item brings up the About / Activation dialog box.where you can see version and activation status, purchase a Clear Disk Info license and activate it.
Monitoring settings - This menu item brings up the Disk Monitoring Settings dialog box.
Uninstall Clear Disk Info - If you previousy installed Clear Disk Info into Program Files, this option lets you easily uninstall it.
Monitor this disk
Would you like Clear Disk Info to monitor the chages in some attributes and notify you about important ones? Well, this is now possible.
Just select the desired disk in the left pane and then tick Monitor this disk, up in the title bar. Clear Disk Info goes to Disk Monitoring Setup mode, as in the picture below.
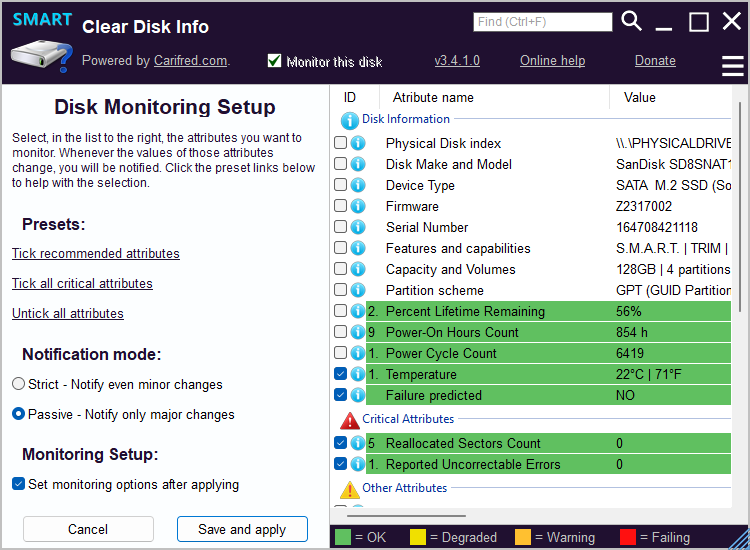
Select, in the right pane, the attributes you want to monitor for this disk, by ticking the corresponding check box. Because different disks have different attributes, this is a per-disk feature. Use the links in the Presets group to help you in the selection.
Then select the desired notification mode. If you want to be notified of even small changes, select the Strict mode. Otherwise, if you want to be notified only about important changes, select the Passive mode.
If you haven't enabled disk monitoring yet, or if you want to change how frequently Clear Disk info will check for attribute value changes, leave Set monitoring options after applying ticked. Otherwise, you can untick this option.
Now you just need to press Save and apply, or Cancel.
If you wanr to stop monitoring a disk, just select ti in the left pane list and untick this box;
Disk monitoring settings
Press the menu button and then select Monitoring Settings. This will bring the Clear Disk Info monitoring settings dialog box, shown in the picture below.
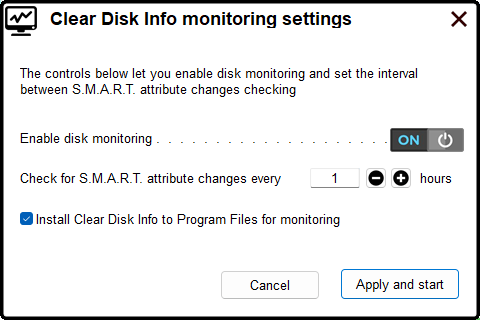
The switch to the right of Enable disk monitoring reflects the current state of the disk monitoring feature. Click this switch to toggle the state from enabled to disabled and vice versa.
If desired, change the pause between attribute changes checking by clicking the plus or the minus buttons or keyboard keys.
At this point you can also decide whether to install Clear Disk Info into the Programs folder. Depending on your decision, tick or un-tick Install Clear Disk Info to Program Files for monitoring.
If you don't want to start monitoring right now, just click Cancel. Otherwise, click Apply and Start.
Monitoring results
Disk monitoring results are displayed in a dialog box similar to the one in the picture below.
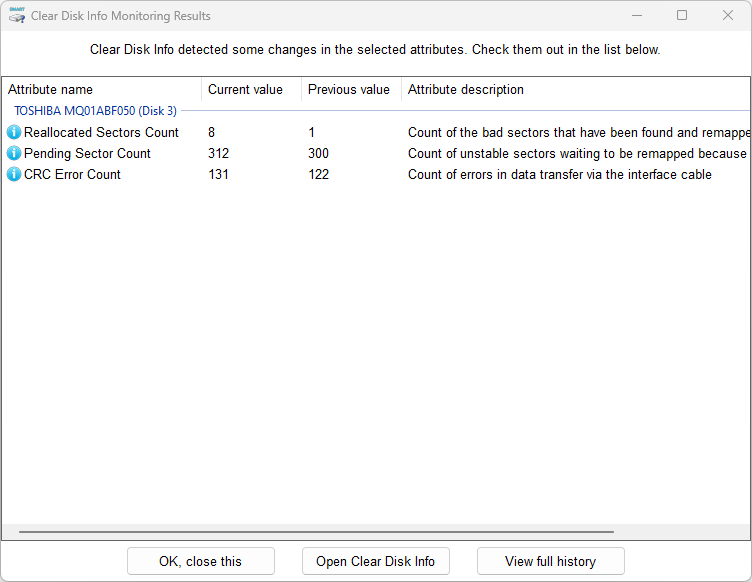
The first column shows the name of the attributes that changed. The second column shows the actual value of those attributes, while the third column shows the previous value. Finally, the fourth column shows the attribute's description.
If you want to view the previous changes that you've already been notified about, click on View full history.. This will display a list similar to the one in the picture below.

Press Clear history whenever you want to start over with disk monitoring.Note that this will delete the history for all disks.
Once you're done with this dialog box you can just close it or press OK, close this.
Monitoring tray icon
When disk monitoring is enabled, Clear Disk Info's icon shows up in your tray. Double-click the icon to open Cear Disk Info, or right-click it for more options. select the desired option.
![]()
Compare results now - This brings up the Monitoring results dialog box.
Show history of changes - This also brings up the Monitoring result dialog box, but in the History of changes tab.
Stop monitoring - This stops the monitoring task and Clear Disk Info terminates.
Title bar and resizer
Clear Disk Info's title bar is a customized title bar that behaves the same way standard Windows title bars do. You can double-click on it to maximize/restore,it. This title bar can also be dragged to the screen's edges to be maximized, and also contains the standard Windows minimize, maximize/restore and close buttons.

The title bar also contains a serch text input box that lets you easily find the desired item in the disk information list. Just enter the text you want to find and hit enter or press the magnifier button to the right of this text field. Keep pressing the magnifier button or the F3 keyboard key until you find the desired item or the end of the list is reached.
Additionally, Clear Disk Info's title bar also contains several links:
- Carifred.com - A link to our website.
- Version link - i.e. 3.0.0.0. Click this link to check if a newer version of the application is available for download.
- Online help - A link to this page.
- Donate - A link to our donations page. Thanks in advance for any help you can provide.
Resizer
You can resize Clear Disk Info's window to the size you desire. You just need to click and drag the resizer at the bottom right corner of the window, which looks like the following picture:
![]()
