DiskCopy


DiskCopy overview
DiskCopy is a user friendly disk/partition cloning tool. It's ideal for both migration to a faster storage device and data backup.
DiskCopy has really cool features such as:
- MBR to GPT and GPT to MBR. You can chose the partition style of the target disk, it does not need to be the same as the source disk's.
- Always bootable. The target disk can be made bootable even if the source disk is not booting up.
- Partition selection. Copy only the partitions you select.
- Single partition cloning. Clone one partition directly to another, and optionally make it bootable.
- Full disk/partition management options. Starting with DiskCopy version 1.1.1, DiskCopy includes a Utilities tab with disk/partition management options.
Current version: 1.4.5.0. Change log
DiskCopy is no longer Beta, but please report any bugs you find to us, using our contact form. Thank you!
Please read the End User License Agreement for our software before using this program.
If you like this program and want to support its future development, you can donate by clicking the button below. Thanks in advance. Any amount is appreciated.
Tutorial content index:
Copy a disk
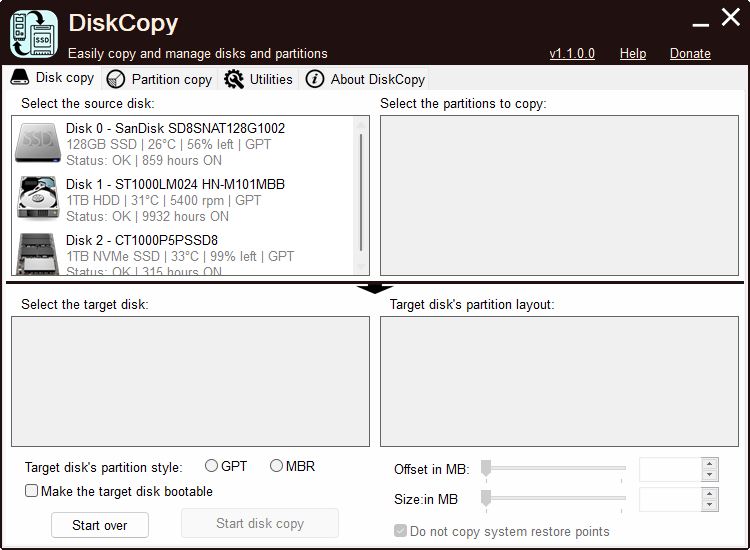
To copy a disk, start by selecting the desired source disk in the top left list (see picture above). To help you identify the desired disk, this list shows some details about the storage devices listed.
Once you select a disk, the corrsponding partition information is displayed in the top right list. This may also help you confirm that the selected disk is really the one you want to copy. If you do not want to copy all the partitions, uncheck the ones you want to skip
Then select the desired target disk, in the bottom left list, and optionally the desired partition stye (GPT or MBR). If you do not change the partition style, DiskCopy will use the same style as the source disk.
At this point you can set the desird partition layout for the target disk. Select one of the target partitions in the bottom right list and use the sliders to change the selected partition's offset and size. You can also enter the desired values in the text input boxes to the right of the sliders, but keep in mind that the partitions can not be smaller than the size of the data to copy. If you don't want to change the partition layout, leave these controls untouched.
If you want to copy all the data, including System restore points, which are located in the System Volume Information folder, uncheck Do not copy system restore points.
If you make a mistake, or if you want to select a different source disk, just press the Start over button.
When you're all set, press Start disk copy, and the confirm by pressing Yes.
If you plan to use both the source and target disks in the same computer, but you're going to boot from the target disk, please unplug the source disk the first time you boot up. This is because the source disk driver is installed in the target disk, and may cause a conflict that prevents the system from booting up.
Copy a partition
If you just want to copy the data from one partition into another, switch to the Partition copy tab.
This feature is quite startight forward. Just select the source partition in the left list, and then the target partition in the right list
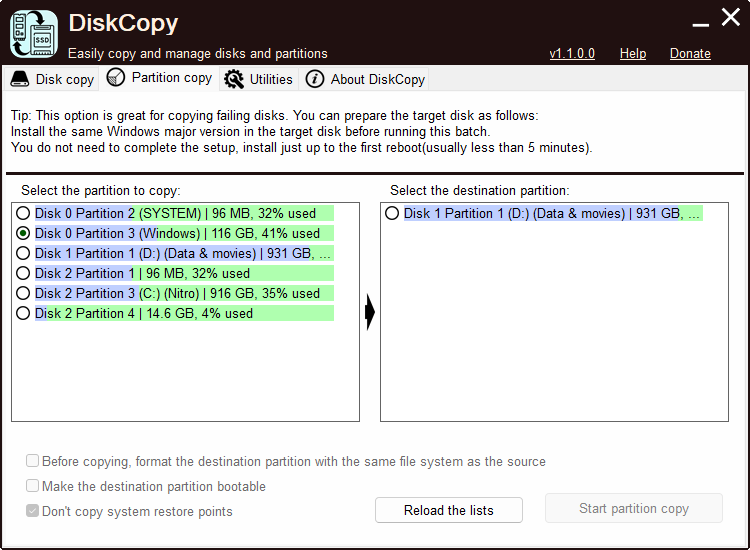
Then, if you want to delete all the data in the target drive before starting the copy operation, tick the corresponding checkbox, near the bottom.
If the target partition lies in a MBR disk, you will also be able to make it bootable, by ticking the Make the destination partition bootable checkbox.
If you want to copy all the data, including System restore points, which are located in the System Volume Information folder, uncheck Do not copy system restore points.
Press the Reload the lists button whenever you want DiskCopy to re-create the partition list, such as when you add a new disk to your system.
Copy progress
While DiskCopy is copying a disk or partition, it displays a dialog box telling you the progress details of the whole operation. This includes a list showing all the actions taken so far and their corresponding results.
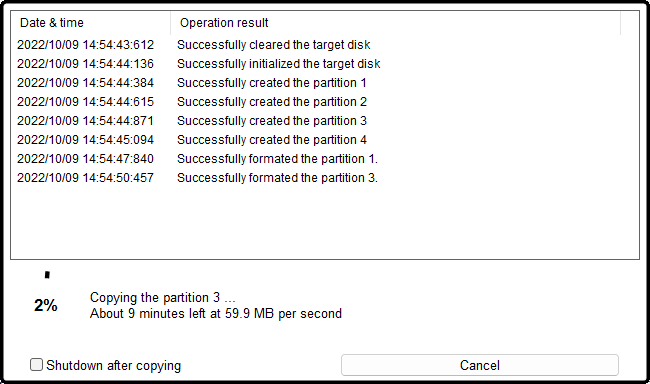
Below that list, the dialog box shows the current partition copy percent (while copying data) and also the estimated time remaining.
At the bottom of the dialog box, you see two interactive elements:
Tick Shutdown after copying if you want the system to be shut down once the whole copy operation completes.
Press the Cancel button whenever you want to cancel he whole copy operation.
The Utilities tab
DiskCopy's Utilities tab provides you with a large set of tools for disk, partition and volume management.
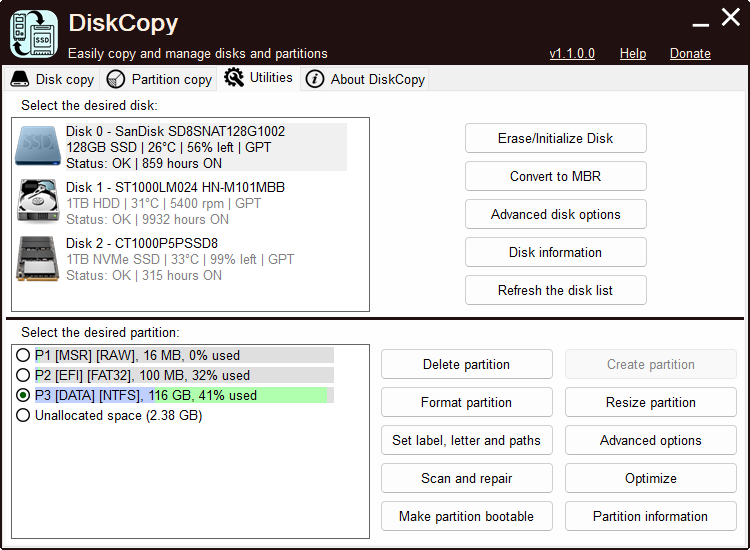
Start by selecting the desired disk in the top left pane's list.
If you are looking for a disk related utility, then click on the top right pane button corresponding to the desired option. For more information, see disk utilities.
If you are looking for a partition related feature, select the desired partition, or unallocated space extent on the bottom left list and then click on one of the available partition utilities.
Disk utilities
Currently, the following disk utilities are available:
►Erase/Initialize disk
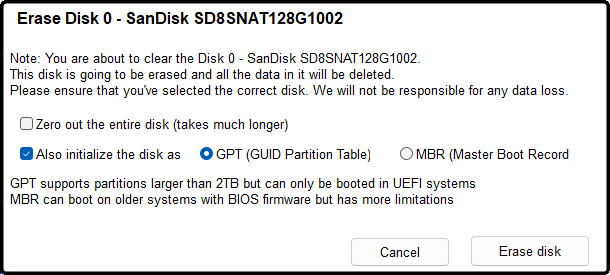
Tick Zero out the entire disk, if you want to securely prevent recovering any data from this disk. This may take long to complete.
If you do not want to initialize the disk, untick Also initialize the disk as, otherwise, select the desired partition style to initialize the disk with (GPT or MBR).
To start erasing and initializing the disk, press Erase disk, and confirm.
►Convert to MBR or Convert to GPT
This option lets you convert the partition style of an already initialized disk. You will be prompted to confirm the operation.
►Advanced disk options
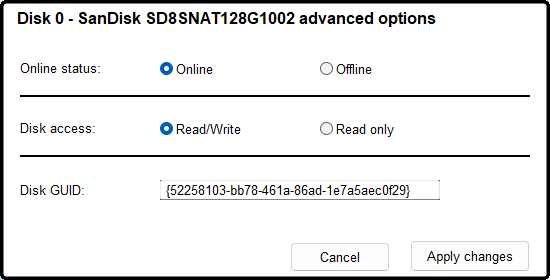
This feature lets you easily bring the selected disk online or offline, and also make it read only or read:write. An offline disk can not be accessed, and a read only disk can not be written to (you can not create or change files).
Some applications use the disk GUID to identify it, so this feature also lets you change that. Just make the desired chages to the controls and then press Apply changes, and confirm.
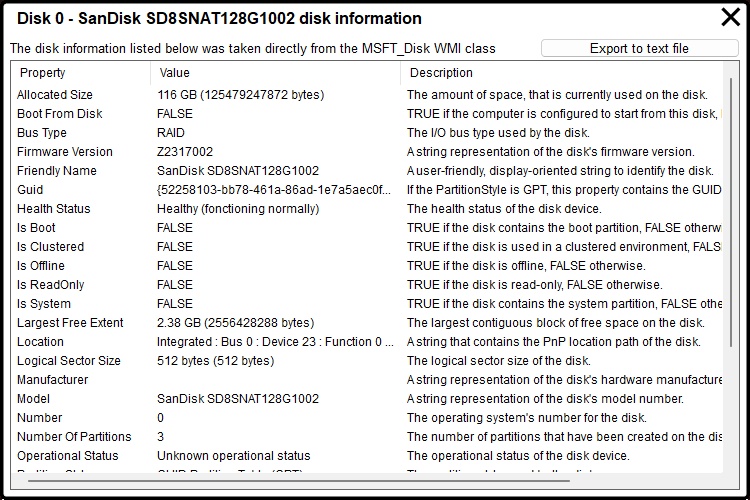
►Disk information
This option displays a list with information about the selected disk, as in the screenshot below
►Refresh the device list
This button forces the disk and partition lists to reload.
►Eject this disk
This feature attempts to eject the selected disk. You can use this option to eject external and also internal disks, if they are not being used by other applications.
Partition utilities
Currently, the following partition utilities are available:
Delete partition
Click this button if you want to delete the selected partition. Note that after deleting a partition, you are no longer able to access the data in it.
Create partition
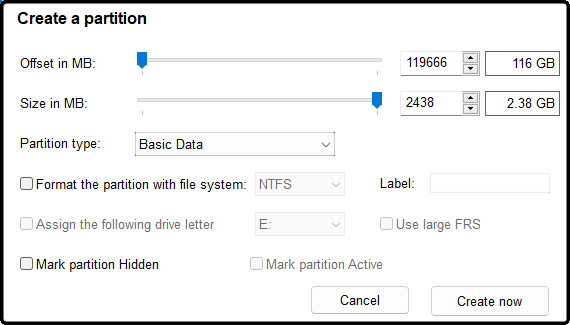
This option is only available if you select an extent of unallocated space in the partition list. By default, DiskCopy will use the whole size of the extent . If you need a custom, size or offset, use the controls at the top to set the desired values.
The default partition type is Basic data if the disk is GPT, or IFS for NTFS or ExFAT if the disk is MBR. This is the equivalent to 'PRIMARY', on diskpart commands. If you need a different partition type, just select the desired one, from the dropdown list.
if you wan to automatically format the created partition and give it a label and a drive letter, tick Format the partition with file system:, and then select the desired file system, enter the desired label, and select the desired drive letter. You can also enable large FRS, mark the partition hidden, an mark it active (on MBR disks).
Once you set evenrything as desired, press Create now, and DiskCopy will then create your new partition.
Format a partition

This feature lets you easily format the selected partition. The default file system is NTFS. Select a different one from the dropdown box, if desired. Optionally enter the desired drive label.
If you want to assign a drive letter to the formated volume, tick Assign the following drive letter:, and optionally select the desired letter from the dropdown box. If desired, tick Use large FRS.
If you want to irrecoverably erase the data in the drive, tick Full (slower). Now you can press Format now and confim, to begin the formating process.
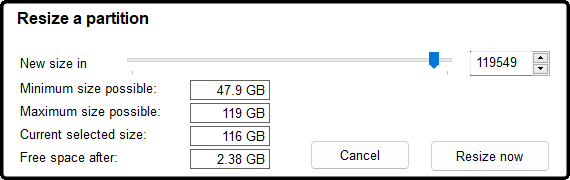
This feature lets you easily resize a partition. Indicate the desired new size using the controls at the top, and then press Resize now. Note that resizing may fail if files can not be moved. If that is the case, select a bigger size and try again.
Set label, drive letter and paths
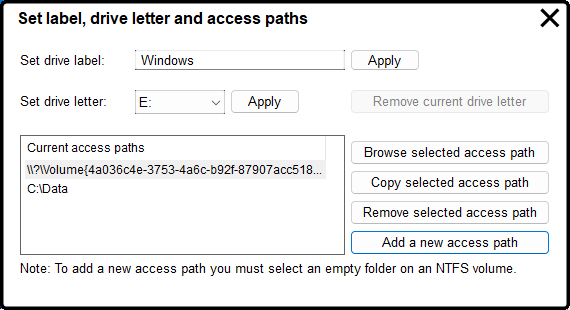
This feature is very simple. To change the volume's label, just enter the desired new one in the top text field, and press the Apply button to the right.
To set a new drive letter for the selected partition, select the desired letter from the dropdown box and press the Apply button to th right. If you want to remove the current drive letter assigned to the partition, press Remove current drive letter.
The list at the bottom left of this dialog box shows the access paths currently assigned to this partition.
Press Browse selected path to open the selected path in the Windows file explorer.
Press Copy selected access path to copy the selected path to the clipboard.
Press Remove selected access path to dissociate the access path from the volume.
Press Add new access path to associate a new access path to the volume. You will need to select an empty folder on an NTFS volume.
Advanced options
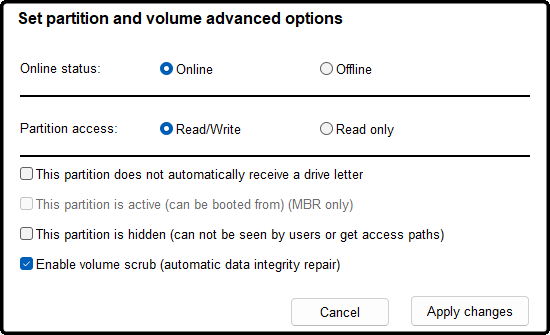
This feature lets you set several partition/volume related options in just a few clicks. Remamber that after selecting the desired settings, you need to press Apply changes, for them to become effective.
Set the desired online status by selecting either Online
or Offline.
Set the desired access mode by selecting
either Read/Write, or Read only.
Tick This
partition does not automatically receive a drive letter, if
that is what you want.
For MBR disks, you can make the
selected partition active for boot by ticking This partition
is active.
If you want this partition not to show up in
the Windows file explorer, tick This partition is hidden.
Enable or disable Automatic data integrity repair on the
selected volume by ticking or unticking Enable volume scrub.
Once you made all the changes you want, press Apply changes and confirm.
Scan and repair
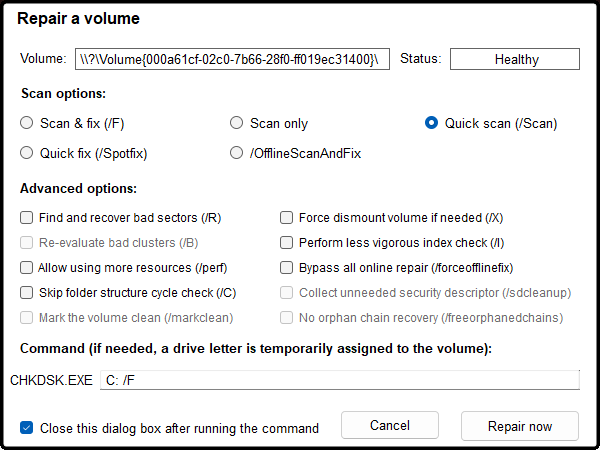
This feature lets you easily run CHKDSK on a volume, even if it does not have an associated drive letter or mounting point. A drive letter is automatically assigned for the duration of the scan, if needed.
The text controls at the top indicate the volume path and the current health status. Select the desired scan options, and optionally the advanced options. The CHKDSK command that will be executed is shown in the text field at the bottom. You can manually change the command's parameters, if you wish.
Once you're done setting up your scan options, press Repair now and confirm.
Optimize
This feature lets you easily optimize a volume, even if it does not have an associated drive letter or mounting point. Obviously, only formated volumes can be optimized. NTFS volumes on SSD disks are trimmed, while other volumes are defragged.
When you press the Optimize button, you are prompted to confirm you want to optimize this volume.
Make partition bootable
This is a exclusive DiskCopy feature that lets you repair the boot on disks that became un-bootable. It works for both GPT and MBR disks.Be sure yo select the correct partition that you want to boot into, the one that contains the Windows folder.
When you press Make partition bootable, you are prompted to confirm the operation.
Partition information
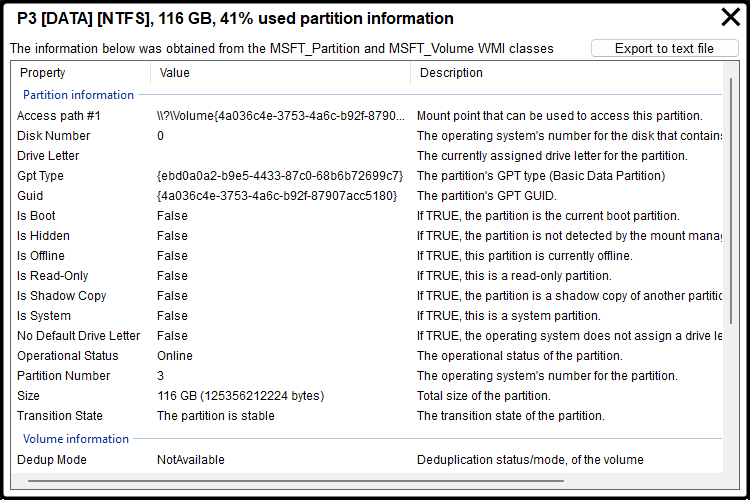
This feature displays a list with partition and volume information, The information contained in the list can be exported to a text file in the location you want by pressing Expot to text file.
The About tab
This tab displays information about the current DiskCopy version.
This tab also contains a few links pointing to pages on our website that we figured you might find useful.
