Tech Tool Store - Add/Edit tools


Overview of the tool creator/editor
If Tech Tool Store does not have all the tools you need, you can quickly create the ones that are missing. After creating your tools, you can edit them the same way as you created them.
Tools created by you are displayed in a special group at the top of the list, named My own tools. They behave exactly like the built-in tools: They can be updated, executed, uninstalled, hidden, etc. They can even have their own icons.
Each tool can download a file from the internet using several methods, run up to four commands plus an extra uninstall command, have an associated description tooltip, website URL and icon. And all this can be set in just a few seconds.
In order to add a new tool, you need to press Add tools, in the right pane. If you want to edit an existing tool, right-click it in the list, to bring up the context menu, and select Edit this tool. In any case, you will be presented with an overlay dialog box, containing four tabs.
Tool settings Command 1 Extra commands Tool info
Supported environment variables Supported commands
Supported environment variables
Tech Tool Store supports all Windows environment variables such as %windir%, %systemroot%, %userprofile%, %temp%, %systemdrive%, %allusersprofile%, %programfiles%, %comspec%, %appdata%, etc. (all case insensitive).
We also added support for more variables to simplify writing common paths (case insensitive):
| %ToolsDir% | The path of the Tech tool store tools folder |
| %ProgramFiles(x86)% | For 64 bits Windows, it's the path of the Program files
(x86) folder. For 32 bits Windows, it the same as %ProgramFiles% |
| %LocalAppData% | Path of Local Application Data. |
| %Desktop% | Path of current user's desktop. |
| %PublicDesktop% | The path of the common desktop folder (usually C:\Users\Public\Desktop). |
| %MyDocs% | Path of current user's documents folder. |
| %CommonDocs% | Path of the common documents folder. |
| %SystemDir% | Path of the system directory (Usually C:\Windows\System32). |
| %SysWOWDir% | For 64 bits Windows, it is C:\Windows\SysWOW64. For 32 bits Windows, it the same as %SystemDir% |
Supported commands
TTS supports windows normal Windows commands, also known as DOS commands. They consist of the name and optional path of an executable file followed by an optional string of one or several command line parameters. Examples:
%ToolsDir%\Folder name\Program name.exe
/parameter1 "Parammeter with white spaces"
%SystemDir%\cmd.exe
takkill /f /im "Program name.exe"
cmd.exe rd /s /q "Folder full
path"
As you can see from the examples above, parameters containing white spaces must be enclosed with double quotes. This applies to expanded environment variables. For instance, a parameter containing %ToolsDir% must always be enclosed with double quotes, because Tech tool store tools contains several white spaces.
TTS also supports commands to open files, and even with extra command line parameters.
For instance, to install an MSI package, you could use the command below:
msiexec.exe "Package path.msi" /passive /norestart
Even though that is is still the recommended way, you can also use the following:
Package Path.msi /passive /norestart
You can also make use of this feature to open internet locations and other protocols. For instance, you can create an app that opens one or several internet pages. Tutorials, for instance. You just need to set the URL of the page as the command.
Or you can make use of the mailto protocol to create tools that email your clients.
mailto:obama@whitehouse.gov?subject=Congrats%20Obama
mailto:obama@whitehouse.gov?subject=Congrats%20Obama&body=Enjoy%20your%20stay.
Or you can make your apps open local documents, such as MS office docs, text files, or PDF docs, by simply specifying the path of the document itself, which will be opened with the default application in the current PC.
%ToolsDir%\Docs\Tutorial 1.pdf
%ToolsDir%\Docs\Tutorial 2.docx
%ToolsDir%\Docs\Tutorial 3.txt
Tool settings
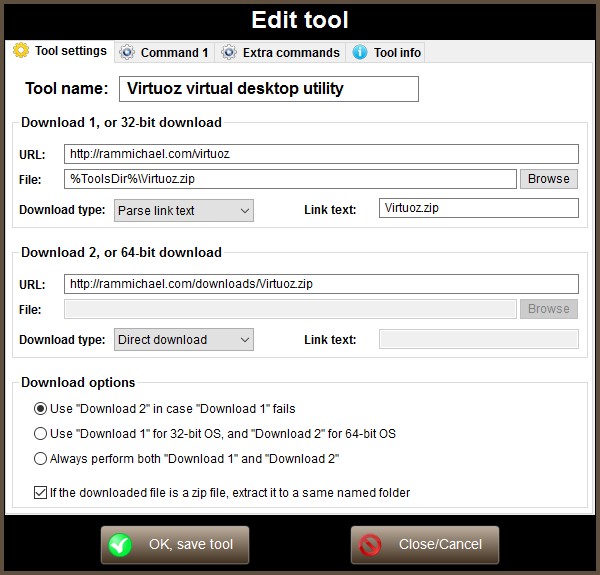
In this tab you can specify the name of your new tool, and optionally the download URLs, if your tool downloads a file. This tab will look like the picture below.
In this tutorial, we will explain how you can create your own tools for Tech Tool Store.
So we start by entering the name of the new tool. If you are editing a tool, you can edit its name by modifying this field.
Next we set the download URLs and types. TTS allows tou to specify two downloads. Depending on the Download options you choose, both downloads may or may not be used:
If you select Use "Download 2" in case "Download 1" fails, which is selected by fefault, then the second download only takes place if the first one fails. Also you can not specify a file for the Download 2. In this case, both downloads use the same file.
If you select Use "Download 1" for 32-bit OS, and "Download 2" for 64-bit OS, you need to specify a different file name for each download. In this case, Tech Tool Store will behave as follows:
- When in Update only mode (you press Update selected), both downloads are performed. You will want to download both files and have them ready to run later in any other computer.
- When in Update and run mode (you press Update and run selected or double-click the tool), only the architecture corresponding to the acual OS bit wil be downloaded.
Otherwise, if you select Always perform both "Download 1" and "Download 2", then both downloadds will allways be performed, regardless of the current OS arch. You need to specify a different file name for each download.
If the downloaded file is a zip archive, then you probably want TTS to automatically extract it for you. In that case, tick If the downloaded file is an archive, extract it to a same named folder. In the current example, we are not using this option, otherwise when the download ends, the contents of the downloaded archive will be extracted to a folder with the same name minus the file extension, The folder is automatically created if it doesn't exist, and the zip file is automatically deleted upon successful extraction, to save you some storage space. You can disable deleting the archive in Settings.
Next you will need to select the method to use in each download. Tech Tool Store supports 6 different download types:
![]() Direct download: This is the easiest method. You just have to
specify the download url.
Direct download: This is the easiest method. You just have to
specify the download url.
The inconvenient of this method is that not all programs have a constant download url. For instance UVK has a constant download url (http://www.carifred.com/uvk/UVKSetup.exe), but for some other programs, the url changes each time a new version is released, i.e. http://www.example.com/program_1.1.exe, then http://www.example.com/program_1.2.exe, and so on.
Also, some web pages provide a temporary download url, which will only last a few minutes.
This is when the other download methods become useful.
![]() Parse link text: To use this method, you need to find a web
page that contains the URL of the target file. The URL will probably
change each time a new version is released, so we provide a few ways
to get around that, depending on the type of element the URL is in.
Parse link text: To use this method, you need to find a web
page that contains the URL of the target file. The URL will probably
change each time a new version is released, so we provide a few ways
to get around that, depending on the type of element the URL is in.
If you don't know anything about HTML code, just try using part of or all the visible text of the link in the page. But that may not work all the time.
To get started, open the web page on your browser, right-click an empty area, and select View page source. Locate the target URL in the text of the page source. The link text you use can be one of three things:
1 ►Text in an anchor link element (<a>). Take the following HTML link as an example:
<a href="/downloads/appname_1.5.7_x64.exe">Download appname</a>
In this case, you can simply use Download appname as the link text. If that text exists more than once in the page, you can use _x64.exe">Download appname, to uniquely identify it. Just ensure the text you copy lies between the <a and the </a> tags of the anchor element. You can also specify the instance number of the text in the page. For example, Download appname,2 would use the second link containing Download appname.2 ►The text right before the download URL, and the text right after, separated with |||. Here's an example:
<button onclick="window.location ='/downloads/appname_1.5.7_x64_maverick.exe'">
In this case, you could use 'window.location ='|||'">' as the link text. In the future, even if the whole final URL changes to something different, the lint text remains valid as long as the sorrounding code does not change. Note that the sorrunding code must be right before and right after the final URL.3 ►Wild cards. You provide the final URL, exactly as it is found in the page's HTML code, and then you replace the part that is suceptible to change, with **. Here's an example:
<button onclick="window.location.href ='/downloads/appname_1.5.7_x32.exe'">
In this case, your lint text could be '/downloads/appname_**_x32.exe'. In the future, if the final URL changes to /downloads/appname_1.5.8_x32.exe, for instance, the lint text remains valid.Notes:
Link text parsing is not case sensitive.
All three methods above work with both relative and fully qualified URLs.
You don't need to know HTML code to use this feaure, but you need to know what a URL is.
![]() Softpedia page: If none of the methods above work for you,
and the program you want to download is part of the Softpedia's list
of software, then you can use this method.
Softpedia page: If none of the methods above work for you,
and the program you want to download is part of the Softpedia's list
of software, then you can use this method.
Just google Softpedia followed by the name of the program, and you will quickly find the page, if it exists. Usually it's address is something like http://www.softpedia.com/get/[Section]/[Program's name].shtml.
Then set the the Download url field with the address of that page, and select Softpedia page.
![]() Majorgeeks page: If the program you want to download is part of the Majorgeeks list
of software, then you can use this method.
Majorgeeks page: If the program you want to download is part of the Majorgeeks list
of software, then you can use this method.
Just google Majorgeeks followed by the name of the program, and you will quickly find the page, if it exists. Usually it's address is something like http://www.majorgeeks.com/files/details/[Program's name].html.
Then set the the Download url field with the address of that page, and select Majorgeeks page.
![]() TechSpot (64 bits) or TechSpot (32 bits): These
download types can be used when a program has two different
downloads: One 32 bits and the other 64 bits.
TechSpot (64 bits) or TechSpot (32 bits): These
download types can be used when a program has two different
downloads: One 32 bits and the other 64 bits.
Note: Techspot downloads are currently not functionning. We're working on a solution.
You just need to find the Techspot page of the desired program. You can goolge TechSpot followed by the name of the program, and you will quickly find the page, if it exists. Usually it's address is something like http://www.techspot.com/downloads/[ID and name].html.
Then set the the Download url field with the address of that page, and select TechSpot (64 bits) or TechSpot (32 bits), according to the version you wish to download.
In the current example, we used the Parse link text method, for the first download, and the Majorgeeks download method for the second download.
At this point, you can test each download by pressing the Test button, to the right of the Link text field. For the Parse link text method, this will display a dialog box with features that will help you easily figure out the link text code.
We are now ready to start setting the tool's commands. Press the Command 1 tab selector.
Command 1
Please read about the supported environment variables and commands before reading this section.
This command is specially designed to install an application. But you can, of course, use it to run whatever you want. If you don't need it, just leave it blank. This command's tab looks like the picture below.
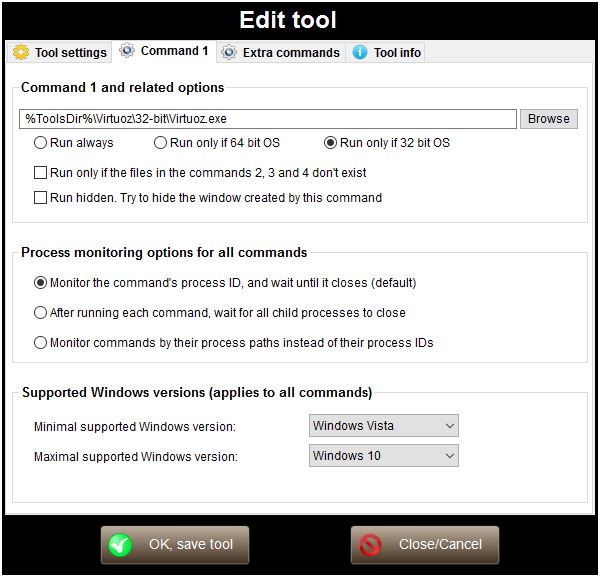
Insert the desired command in the respective text input box. The text box supports drag and drop, so if you have the file to open handy, just drag it to the text box, and it's path will be automatically set.
You can also press the Browse button to locate the file to open using the Windows Shell. Paths are automatically converted to their corresponding environment variables.
Select the run desired options, if any.
![]() Run always: The command will be executed,
regardless of the OS architecture.
Run always: The command will be executed,
regardless of the OS architecture.
![]() Run only if 64 bit OS: The command will
be executed only if Windows is 64-bit.
Run only if 64 bit OS: The command will
be executed only if Windows is 64-bit.
![]() Run only if 32 bit OS: The command will
be executed only if Windows is 32-bit.
Run only if 32 bit OS: The command will
be executed only if Windows is 32-bit.
This is very useful for tools that have different files for 32 and 64-bit, or if you're using the Use "Download 1" for 32-bit OS, and "Download 2" for 64-bit OS download option.
Select the desired additional options for this command.
![]() Run only if the files in the commands 2,3 and 4
don't exist: Check this option if you want to skip this
command if the files in the commands 2, 3 and 4 already exist. This
may be useful, for instance to install an application only if it is
not already installed.
Run only if the files in the commands 2,3 and 4
don't exist: Check this option if you want to skip this
command if the files in the commands 2, 3 and 4 already exist. This
may be useful, for instance to install an application only if it is
not already installed.
![]() Run hidden. Try to hide the window created by
this command: Use this option only for commands that do not
require user interaction. TTS will try to hide the window created by
the process spawned by the command.
Run hidden. Try to hide the window created by
this command: Use this option only for commands that do not
require user interaction. TTS will try to hide the window created by
the process spawned by the command.
Select the process monitoring option for all commands.
![]() Monitor the command's procedd ID, and wait until
it closes (default): Tech tool store will monitor the process
spawned by each command, and wait until that process is no longer
before stepping to the next command.
Monitor the command's procedd ID, and wait until
it closes (default): Tech tool store will monitor the process
spawned by each command, and wait until that process is no longer
before stepping to the next command.
![]() After running each command, wait for all child
processes to close: Using this option, TTS will not only
monitor the command's process, but also any processes cfreated by
the command itself. This is useful for packed tools, which extract
to a temporary directory and then run the extracted files.
After running each command, wait for all child
processes to close: Using this option, TTS will not only
monitor the command's process, but also any processes cfreated by
the command itself. This is useful for packed tools, which extract
to a temporary directory and then run the extracted files.
![]() Monitor commands by their process paths instead
of their process IDs: Using this option, TTS will not step to
the next command until there is no process running with the
specified path. This is useful to monitor tools that may already be
running.
Monitor commands by their process paths instead
of their process IDs: Using this option, TTS will not step to
the next command until there is no process running with the
specified path. This is useful to monitor tools that may already be
running.
In our Virtuoz virtual desktop utility example, we set theis command as %ToolsDir%\Virtuoz\32-bit\Virtuoz.exe.
If your tool does not run in all Windows versions since Windows XP up to Windows 10, then running it in unsupported Windows versions could cause errors or even damange. You can prevent that from happening by specifying the minimal and maximal supported Windows versions, by simply selecting them in the corresponding drop-down boxes.
Extra commands
Please read about the supported environment variables and commands before reading this section.
The Extra commands tab allows you to specify three more command to run, and an additional uninstall command.
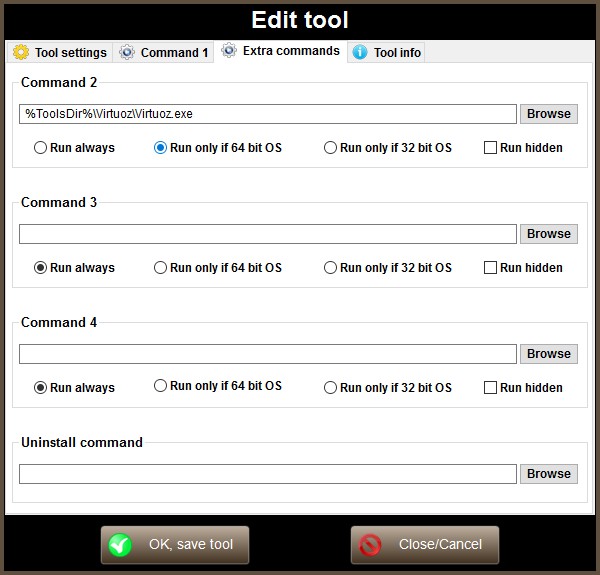
Enter the desired commands in the respective text boxes. Just as with the command 1, the text boxes support drag and drop of files, and you can use the Browse button to locate the file to run using the Windows Shell.
Select the run desired options, if any.
![]() Run always: The command will be executed,
no matter the OS architecture.
Run always: The command will be executed,
no matter the OS architecture.
![]() Run only if 64 bit OS: The command will
be executed only if Windows is 64-bit.
Run only if 64 bit OS: The command will
be executed only if Windows is 64-bit.
![]() Run only if 32 bit OS: The command will
be executed only if Windows is 32-bit.
Run only if 32 bit OS: The command will
be executed only if Windows is 32-bit.
![]() Run hidden: Use this option only for
commands that do not require user interaction. TTS will try to hide
the window created by the process spawned by the command.
Run hidden: Use this option only for
commands that do not require user interaction. TTS will try to hide
the window created by the process spawned by the command.
The options above are not available for the uninstall command. To easily retrieve the uninstall command of a specific program, use one of the built-in tools, such as UVK's Smart uninstaller.
In our Virtuoz virtual desktop utility example, the tool has different executables for 32 and 64-bit Windows, so we set the corresponding options fo each file. This way, only the correct file, according to the current Windows architecture will be executed.
Enter the uninstall command for this tool in the last input field.
Commands can be easily copied from the Smart Uninstaller section of UVK. Just double-click the uninstall entry corresponding to the program you're automating, then copy the Uninstall string field from the Uninstall entry properties dialog box and paste in the Tech Tool Store's Uninstall Command field.
Tool info
The Tool info tab allows you to specify the tool's tooltip text, website URL, and icon. All the fields in this tab are optional.
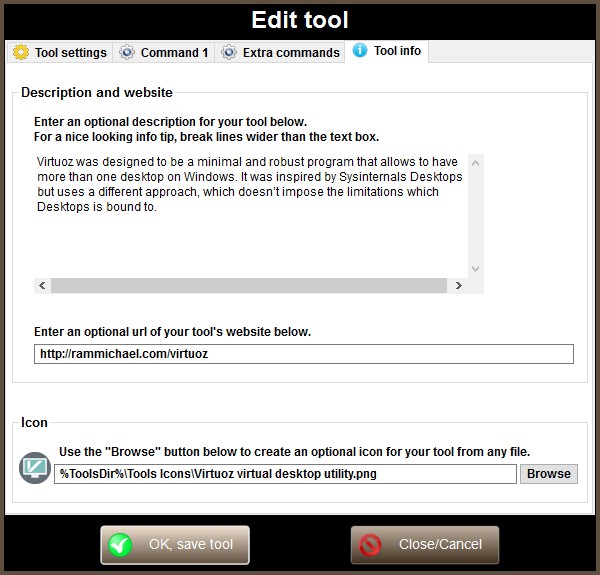
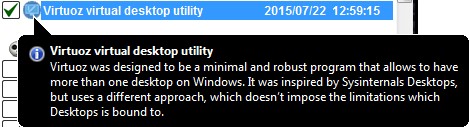
Enter a quick description of your tool in the corresponding text box. In our Virtuoz virtual desktop utility example, we just copied the description directly from the author's website. This is the text that will be displayed in the tooltip when you select the tool in the list, and it is very useful to know what a tool does, among so many.
Don't forget to break lines wider than the text box, for a better looking tooltip.
Enter the URL of the tool's website. You will be able to quickly visit this URL later by selecting Go to this tool's website, from the list's context menu.. This may be useful if you want to update the tool's related fields later, or check its current version.
Choose an icon for your tool by dragging a file to the corresponding text field, or use the Browse button to locate the file using the Windows Shell. Normaly you would choose the tool's main executable as the icon file, but you can choose any file. TTS uses the Quick Any2Ico's technology to create the icons, so it is able to generate an icon from virtually any file system object.
You would think that setting the icon doesn't matter much, but the truth is that it does. It really helps to quickly locate the tool. Imagine the whole Tech Tool Store list without icons...
