
UVK Help - Smart uninstaller


This module can be accessed by clicking Smart uninstaller, in the Home page.
Contents
Selecting the uninstall entries
Getting information about an uninstall entry
Setting the extra uninstall options
Uninstalling the selected programs
Smart uninstaller features
The Smart uninstaller is a fully featured replacement for the Add/Remove programs control panel applet.
However, the Smart uninstaller has much more features than the native Windows applet. It was specially desinged to detect and uninstall adware, malware and stubborn programs, ensuring a complete removal.
When using the UVK's Smart uninstaller, you are able to:
![]() Uninstall several programs at once, and in automated mode, if
desired.
Uninstall several programs at once, and in automated mode, if
desired.![]() Force uninstall of stubborn programs.
Force uninstall of stubborn programs.![]() Get information about the uninstall entry.
Get information about the uninstall entry.![]() Delete the uninstall entry without uninstalling the program.
Delete the uninstall entry without uninstalling the program.![]() Change the uninstall entry's icon.
Change the uninstall entry's icon.![]() Verify the uninstall file's signature.
Verify the uninstall file's signature.![]() Get the uninstall file's VirusTotal report.
Get the uninstall file's VirusTotal report.![]() Jump to the location of the program's folder or the
uninstaller file.
Jump to the location of the program's folder or the
uninstaller file.![]() Open the uninstall entry's help/info url.
Open the uninstall entry's help/info url.![]() Hide Microsoft signed files from the list.
Hide Microsoft signed files from the list.![]() Change the way the uninstall entries are dysplayed in the list.
Change the way the uninstall entries are dysplayed in the list.![]() And much more...
And much more...
Sorting the uninstall list
The list can be sorted in details view by pressing the column header buttons. The items will be sorted in ascending/descending order.
Selecting the uninstall entries:
To select one single uninstall entry, just click it. Hold Ctrl down while clicking other entries to add them to the selection.
If not in details view, you can also use your mouse to create the selection, just like you do when selecting several items in your desktop, or in a Windows explorer folder's window.
Getting information about an uninstall entry:
Select the desired uninstall entries in the list. Press Uninstall entry properties on the upper pane or on the menu (Ctrl+Enter), or double click the corresponding icon. A dialog box similar to the one in the picture below will popup.
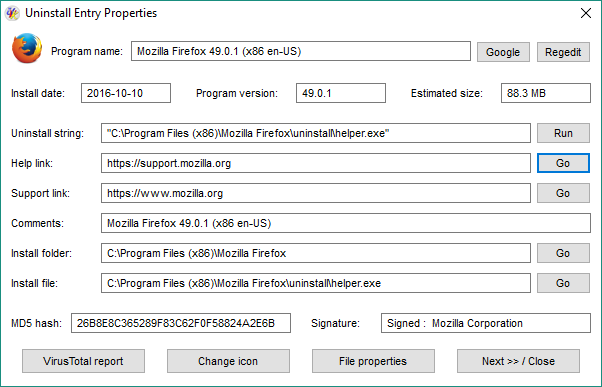
Pressing the Google button will open your default internet browser and perform a google search using the uninstall entry's name as the keyword.
Pressing the Regedit button will open the uninstall entry in the Registry editor.
Pressing the Run button in the Uninstall string line will run the uninstall command. Note that you have better ways to unninstall a program. See below.
Pressing the Go button in the Help link or the Support link lines will take you the corresponding web page, if it's set.
Pressing the Go button in the Install folder or Uninstall file lines will show you the hard drive location of the corresponding folder/file.
The next line shows you the MD5 hash and digital signature of the uninstall file.
Pressing the VirusTotal MD5 hash report button will show you the VirusTotal report of the uninstall file, if available.
Pressing the Change icon button will allow you to set a different icon for the uninstall entry. It will open the Windows Pick Icon dialog, where you can select the new icon from an exe, dll or ico file. Very useful if the icon is not displaying properly.
Pressing the Close (Esc) button, or pressing the Esc key will close this dialog box.
White/Black list
You can whitelist or black list any of the programs in the list.
To whitelist one or several items, just select the desired ones, then right-click over the selection or press the Menu button, and finally select Whitelist this item (Ctrl+W). Whitelisted items will not be displayed again and are immediately removed from the list.
To blacklist one or several items, just select the desired ones, then right-click over the selection, and finally select Blacklist this item (Ctrl+B). Blacklisted items are automatically selected when you open the Smart Uninstaller, and can also be highlighted whenever you want, by pressing the Select blacklisted (Alt+B) context menu item.
Both the whitelist and the blacklist are not sensitive to the programs versions. When you white/black list an application, you are doing it for all versions of that application. i.e. whitelisting Java 8 update 10 also whitelists Java 8 update 15 and Java 9 update 2.
To manage the Smart Uninstaller's whitelist, press the Menu button, and select Whitelist & Blacklist manager. You will be presented with a dialog box similar to the one in the picture below.
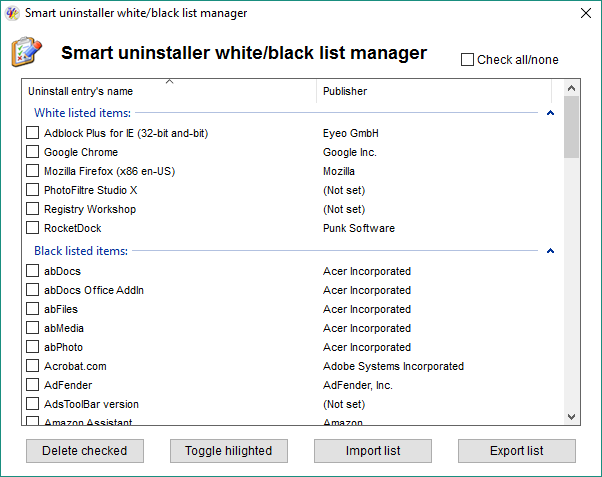
The list shows the whitelisted items in one group, and the blacklisted items in another group. Thick the checkbox next to the items you want to remove from the list, press Delete checked and confirm. This removes the selected item(s) form the corresponding list.
If you figured you aded an item to the wrong group (i.e. you black listed it when you wanted to white list it), just highlight the item and click the Toggle hilighted button. Only one item can be toggled at a time.
You can easily export and import the whitelist to/from an external file. This will be particularly useful to make baclup copies of the lists, or to transfer them to a different computer.
To import the lists from a file, press Import list and select the INI file the list was previously exported to.
To export the list, press Export list and select the INI file path and name you wish to export to.
If you save the ini file in the same directory as UVKPortable or UVKSetup, and the INI file name is UVK SU whitelist.ini, the UVK package will automatically import the lists the next times you use it to install and run UVK.
When you are done using this feature, just close this dialog box.
Setting the extra uninstall options:
Before uninstalling the selected programs, select the options of your preference in the upper pane:
![]() Use
forced uninstall: This option should only be used if you are
sure you want to uninstall the selected programs.
Use
forced uninstall: This option should only be used if you are
sure you want to uninstall the selected programs.
UVK will manually uninstall the selected programs, without running their uninstall command. You should use this option to uninstall malware, adware and other programs that can not be uninstalled by normal means. To ensure complete removal when using this option, you should also check Scan and remove remnants.
![]() Scan
and remove remnants: If this option is selected, after
uninstalling the selected programs, UVK will search
the registry for remaining entries pointing to the uninstalled
programs. It will also search your hard drive for shortucts pointing
to the uninstalled programs.
Scan
and remove remnants: If this option is selected, after
uninstalling the selected programs, UVK will search
the registry for remaining entries pointing to the uninstalled
programs. It will also search your hard drive for shortucts pointing
to the uninstalled programs.
The items it finds will be displayed in a list where you can choose what to delete. An option to create a system restore point before removing the remnants is supplied.
Note: Removing the remnants found is available only for the users having a UVK license.
![]() Try
unattended uninstall: If you select this option, UVK will try to
automate the uninstall process.
Try
unattended uninstall: If you select this option, UVK will try to
automate the uninstall process.
This feature is guaranteed to work 100% for all programs installed through the Windows installer. For other programs, UVK will try to automatically click the buttons in the unninstall dialogs containing text like Next, Uninstall, Yes, OK, etc.
Given the high number of different software programs out there, it's impossible to guarantee the success of the automation for all non Windows installer programs in all languages. Each program uses their own uninstall dialogs and methods.
However, our tests indicate over 90% success rate for the most common european languages.
![]() Hide
Microsoft signed files: When you check this option, UVK will
verify the digital signature of all the files in the list, and
remove the ones that are digitally signed by Microsoft.
Hide
Microsoft signed files: When you check this option, UVK will
verify the digital signature of all the files in the list, and
remove the ones that are digitally signed by Microsoft.
This can highly reduce the number of programs in the list, granting an easier detection of unwanted/un-needed programs, in order to easily clean up your system from those programs.
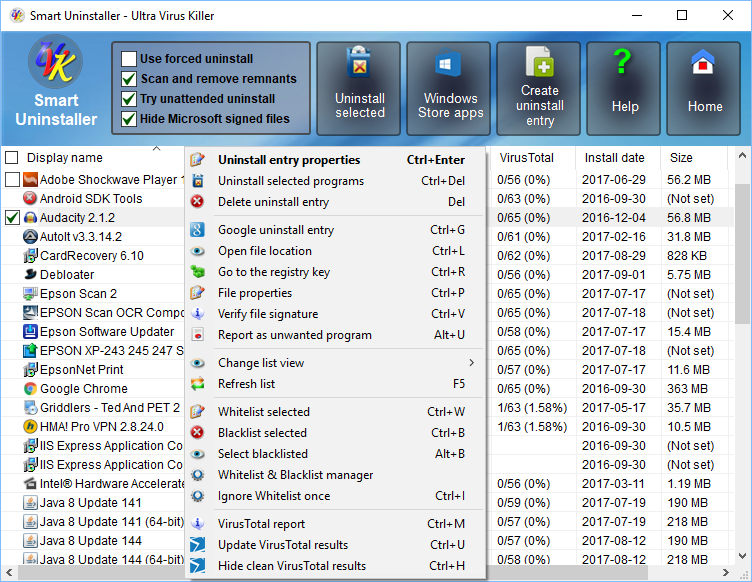
Uninstall list context menu:
To access the uninstall list's context menu, right-click any item in the list, or press the Menu button.
A menu with several options will be displayed:
The first two options, we have already explained.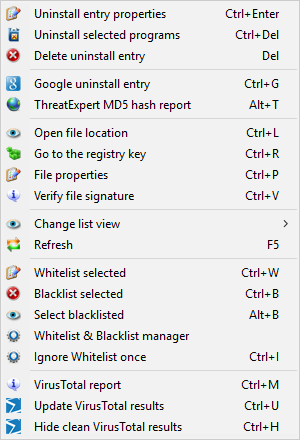
Delete uninstall entry:
Use this option if you want to
delete the uninstall entry from the registry. Note that this will
not uninstall the program.
Google uninstall entry (Ctrl+G):
Makes a quick google search using the program's name.
ThreatExpert MD5
hash report (Alt+T):
ThreatExpert has an
excelent malware info database. If the selected file is present in
this database, you can get information on which files it creates,
which registry entries it changes, etc.
Open file location (Ctrl+L):
Opens the location of the uninstall file using the Windows
explorer shell.
Go to the registry key (CTRL+R):
Opens the registry editor in the uninstall entry's key.
File properties (Ctrl+P):
Opens the uninstall file
properties dialog box, allowing you to get more information about
the file.
Verify file signature (CTRL+V):
Displays a message box
containing information about the uninstall file's digital signature.
Change list view:
Select the desired view mode for the
list. Valid modes are Icons, Details, List and
Tiles.
Refresh (F5):
Refreshes the uninstall list.
Whitelist selected (Ctrl+W):
Add the selected item(s)
to the Smart uninstaller's whitelist.
Select blacklisted (Alt+B):
Hilight items in the list
which are present in the Smart uninstaller's blacklist.
Blacklist selected (Ctrl+B):
Add the selected item(s)
to the Smart uninstaller's blacklist.
Ignore Whitelist once (Ctrl+I):
This button, only
available when you're using the Smart uninstaller's white/black list
feature, allows you to refresh the list while ignoring the whitelist
(displaying all the items). This is useful to quickly uninstall one
of the whitelisted programs or check if it is installed.
VirusTotal report (Ctrl+M):
Creates an html VT report of the selected
uninstaller files.
VirusTotal has the most complete virus info database.
Update VirusTotal results (Ctrl+U):
Update the results
in the VirusTotal column.
Hide clean VirusTotal results (Ctrl+H):
Delete any
items with clean VirusTotal results from the list.
Uninstalling the selected programs:
After selecting the programs you want to uninstall and the unistall options, press Uninstall selected, in the upper pane or Uninstall selected programs, in the menu.
A confirmation message box will be displayed. Press Yes to confirm, No to cancel.
If you have chosen Yes, UVK will start uninstalling the selected programs. Depending on the selected extra options, and the way the programs are uninstalled, you may or may not have to perform any actions in order to complete the uninstall process.
If the Use forced uninstall option is selected, and some files are scheduled to be deleted on reboot, you will be prompted to reboot.
Adding uninstall entries to the list:
If you find a program that has an uninstaller, but it is not displayed in the Smart uninstaller's list, you can quickly add it to the list.
To do so, just drag the uninstaller executable to the Smart uninstaller list of programs, or press the Create uninstall entry button. A dialog box similar to the one in the screenshot below will popup.
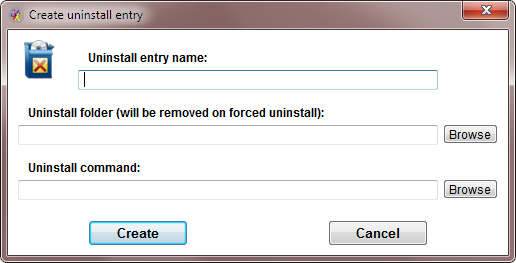
Uninstall entry name:
Enter the name you wish for your custom uninstall entry in the Uninstall entry name field. It can be any name of your choice, but longer than six characters. To prevent confusing your custom entry with an existing one, you should give it a unique name.
Uninstall folder (will be removed by forced uninstall):
Enter the path of the uninstall folder associated with your uninstall entry in the Uninstall folder field, or use the Browse button to locate the folder using the Windows shell.
Note: The folder you specify will be forcefully deleted, even if you don't use the Forced uninstall option. You can leave this field blank, in which case the Smart uninstaller will automatically determine the uninstall folder based on the uninstall command.
If you set this field with a valid directory path, and leave the Uninstall command field empty, the Smart uninstaller will always treat this uninstall entry as if Use forced uninstall is checked, even if it is unchecked.
Also, the Smart uninstaller will use this path as the base directory to search for uninstall remnants. You can take advantage of this feature and use the Smart uninstaller to delete specific folders and also any registry entries, services and tasks pointing to files inside them.
Tip: Drag a folder directly from the Windows file explorer over the Smart uninstaller's list to automatically fill out this field.
Uninstall command:
Enter the uninstall command to associate with your custom uninstall entry in the Uninstall command field, or use the Browse button to locate the uninstaller executable using the Windows shell. You can leave this field empty, as explained above.
If you specify a valid command in this field, and do not use the "Forced uninstall" option, the Smart uninstaller will run the uninstall command you specify, and then perform a forced uninstall anyway.
Tip: Drag the uninstaller executable or the uninstall shortcut from the "All programs" Start menu folder over the Smart uninstaller's list to automatically fill out this field.
Create the uninstall entry, or cancel:
After you fill the desired fields, press the Create buton to create your custom uninstall entry, or press the Cancel button, to close this dialog box.
