
UVK Help - Tools and Tweaks


You can access this module by clicking Tools and Tweaks, in the Home Page.
This module includes several tools for file, registry and system restore management.
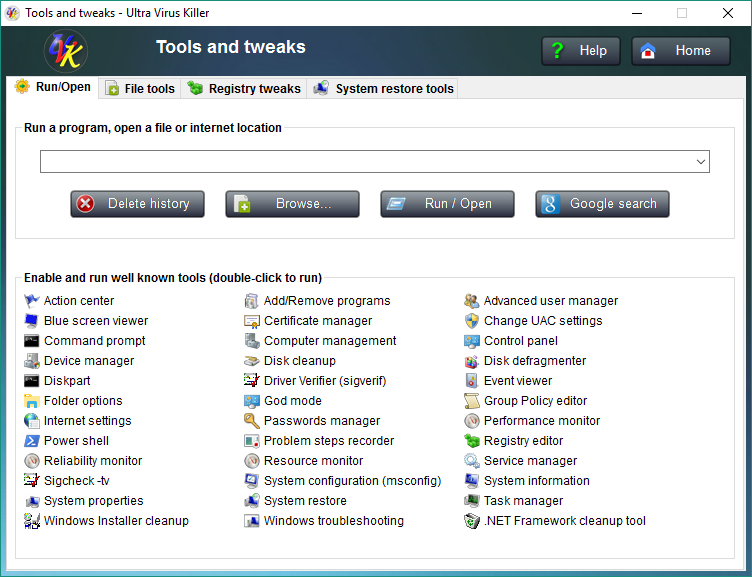
Run/Open:
This tab provides you with an easy way of running commands, open files and protocols, and perform Google searches.
Just type whatever you want to run, open or search for in the dedicated input field. This input box also supports drag & drop, so if the file you want to open is handy, just drag it to the input box.
Once you've entered the desired text, hit the enter key or press the Run / Open button to open it, or press the Google search button to google it. Any processes created with this feature will have administrator rights.
After running a command or performing a google search, the text is automatically saved to a list that will be memorized across instances of the application. The next time you want to run the same command or perform the same search again, just drop down the run list and select the desired command. This list can be cleared by pressing the Delete history, button.
The Enable and run well known tools list below contains the most common Windows built-in tools, and even a few third party tools. So, if you're running a Windows command, you can check if it is present in this list. That will make easier for you to run the command, but it will aslo enable the desired tool, in case it has been disabled by group policies. Commands in this list can be executed by double-click.
In case you were wondering, the "non built-in" tools contained in this list are Blue screen viewer, Sigcheck -tv, Windows installer cleanup and .NET Framework cleanup tool.
File tools
The File tools tab allows you to manage files, unlock locked folders, and fix/protect the executable file associations.

To manage a file, first you must enter its path in the
corresponding input box. To easily do it, click Browse, then browse to the
path where the file you want to manage is located. Select the
desired file and click Open. The
path of the file will be added to the input box.
You may now use the options below:
![]() File information: Will display a dialog box
containing information on the selected file. See the
screenshot below:
File information: Will display a dialog box
containing information on the selected file. See the
screenshot below:
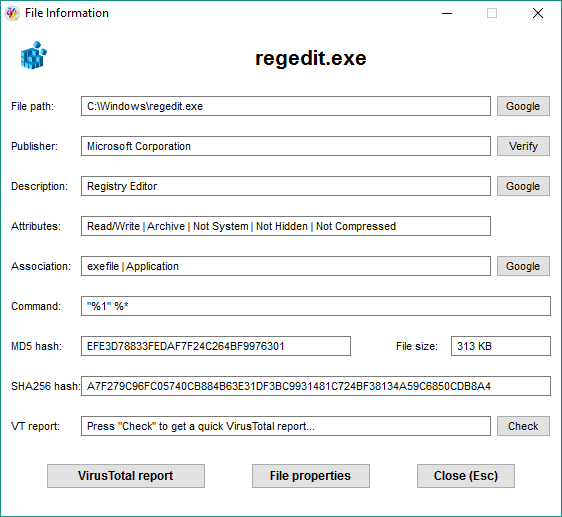
As you can see in the screenshot above, the dialog shows several information fields and some buttons to perform extra actions.
By default, the publisher displayed is not verified. Click Verify to verify it. Click the Check button to check if the file is infected using the VT api.
Click the VirusTotal report button to view the report of the last VirusTotal analysis of this file.
Click the File properties button to open the file's properties dialog.
Click the Close button or just press Esc to close the dialog box.
![]() Perform action: Select the action you want to perform in the
drop down box to the left before using this feature. Available actions are:
Perform action: Select the action you want to perform in the
drop down box to the left before using this feature. Available actions are:
-
VirusTotal report: Generate a VirusTotal report of the selected file, in HTML format.
-
Google file name: Will make a quick google search using the file name as the keyword.
-
Lock file (deny access): This will edit the file's security descriptor, and deny everyone access to the file. Useful to block infected files when you're not able to delete them.
-
Unlock file (grant access): This will grant everyone full access to the file. Useful to restore acces to files that have been blocked by malware.
-
Unlock and delete file: This will grant everyone full access to the file and the delete it. Use this feature to delete infected files.
-
Scan with the system file checker: This will scan the file's integrty with sfc.exe, and repair it if needed. This feature is only useful for system files and is only available on Vista or newer Windows versions.
Unlock a locked folder:
This feature allows you to recursively grant access permissions to a specific file folder, even if you can not do it using the security tab of the folder's properties dialog.
If you keep getting access denied or other errors when trying to gant access to a folder, then this feature can save your day.
Enter the path of the folder you want to unlock in the corresponding input box, or click the Browse button to locate the folder using the Windows shell.
Click the Unlock it! button, confirm, and you're ready to go.
Fix file extensions:
To fix a file extension, just select the one you want to fix from the combo box right after Select extension: and then click Fix extension(s).
Supported extensions are: .exe, .msi, .reg, .bat, .cmd, .com and .vbs.
If you wish to fix all the seven extensions at once, select All from the combo box and then click Fix extension(s).
UVK can help you to prevent these file extensions from being changed again. Just click the Lock extensions button, and confirm that you wish to protect the registry keys from being changed. This feature is also available from a UVK script with the command <ProtectFileExtensions>
This can be undone by clicking the button Unlock extensions, which will reset the access permissions for the registry keys. This feature is also available from a UVK script with the command <UnlockFileExtensions>
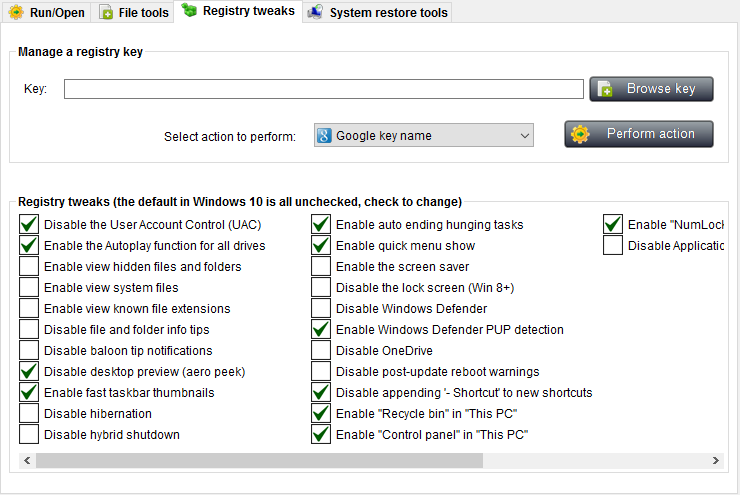
Registry tweaks
The Registry tools tab provides you with useful Windows registry tweaks, and also a simple way of managing registry keys.
Be careful when messing up with the registry. If you're not sure of what you're doing, then don't do anything. Changes to the registry can cause serious damages to your operating system.
To manage a registry key, first you need to enter its name (full registry path) in the Key input box.
To easily do it, click Browse key. Select the desired key in the registry tree, and press OK. The full path of the selected key is set in the Key input field.
![]() Perform action: Select the action you want to perform in the
drop down box to the left before using this feature. Available actions are:
Perform action: Select the action you want to perform in the
drop down box to the left before using this feature. Available actions are:
-
Google key name: This will perform a quick google search using the key's name as the keyword.
-
Protect key from changes: This will set read only access permissions to the key. Useful to prevent important registry keys from being changed by malware.
-
Unlock key (grant access): This will grant everyone full access to the key. Useful to restore acces to keys that have been blocked by malware.
-
Unlock and delete key: This will grant everyone full access to the key and then delete it. Use this feature to delete infected keys.
The Registry tweaks list:
This feature allows you to quickly tweak a few windows features. This is done on the fly, as you check or uncheck the items in the list, the corresponding feature is enabled or disabled, respectively.
However, not all of the tweaks take effect instantly. Some only take effect after the current uses logs off and on again, while others are only effective after a system reboot. In order to know when a fix takes effect, select it in the list, and have a look at the footer label below the list which will tell you what you need to know.
System restore tools
This feature allows you to manage the existing restore points, or create new ones. Since Windows does not allow you to delete specific restore points, it may become very useful.
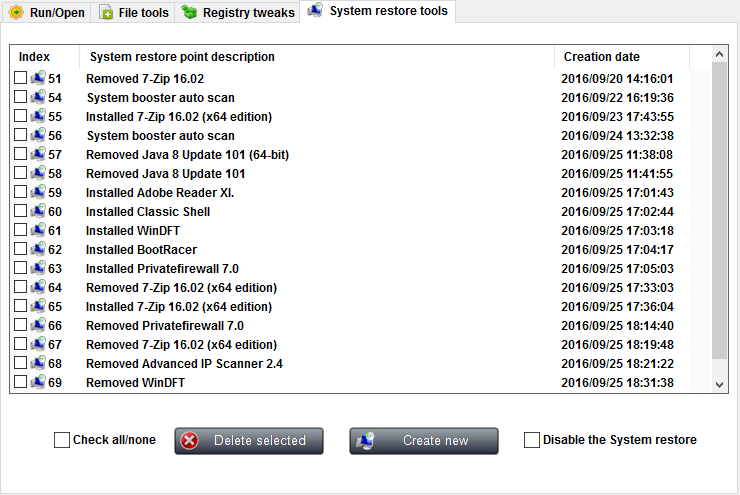
To delete one or several restore points, tick the check box next to the ones you want to delete, or use the Check all/none check box to toggle the ticked state of all the items in the list at once. then click the Delete selected button, and confirm by clicking Yes.
To create a new system restore point, click the Create new button. You'll be asked to enter the name for the new restore point.
You can also enable/disable the System restore in this section. Just check/uncheck the Disable the system restore checkbox.
To return to the Home Page click Home or press Esc.
