
UVK Help - Quick user manager


This module can be accessed by pressing Quick user manager, in the Home page.

Content index:
Changing a user account's picture
Setting a user account's password
Quick User Manager overview
Quick user manager is a technician tool included in UVK 6.9 or higher, which contains all user account management options in a simple, user friendly interface. Quick user manager can also be downloaded as a separate portable app here.
You are able to change user account settings, like disable/enable the account, clear the lockout state, auto-logon a user, and remove user accounts from the welcome screen.
You can also set the picture associated with a user account, set or remove its password, delete and create user accounts.
Quick User Manager was built with simplicity and ease of use in mind. All the features are shown in the main interface, so you can perform the desired changes with just a few clicks.
Quick User Manager version 1.5 and higher also provide a link to launch Account Profile Fixer staright from the main interface.
Modifying a user account
To change a user account's settings, select the desired account in the list (left pane), set the desired settings in the right page and press Save changes. You will be presented with a message box asking you for confirmation. Press Yes to confirm, or No to cancel.
Below is a description of each setting.
![]() User
account name: This field corresponds to the real account name,
the one that was saved in the Security account manager (SAM). This
field can not be changed. To change the user name displayed in the
welcome screen and start menu, use the User display name
field instead.
User
account name: This field corresponds to the real account name,
the one that was saved in the Security account manager (SAM). This
field can not be changed. To change the user name displayed in the
welcome screen and start menu, use the User display name
field instead.
![]() User
display name: This field contains the user name that is
displayed in the welcome screen, start menu and the User accounts
control panel applet. It can be edited for all non built-in user
accounts.
User
display name: This field contains the user name that is
displayed in the welcome screen, start menu and the User accounts
control panel applet. It can be edited for all non built-in user
accounts.
![]() User
privilege: The privilege assigned to the user account. This
setting is grayed out for built-in accounts, and for the current
user, in order to prevent removing all the administrator accounts.
Available settings are Guest, Standard user and
Administrator.
User
privilege: The privilege assigned to the user account. This
setting is grayed out for built-in accounts, and for the current
user, in order to prevent removing all the administrator accounts.
Available settings are Guest, Standard user and
Administrator.
![]() The account
is disabled: Whether to disable the selected user account. This
setting is grayed out for built-in accounts, and for the current
user, in order to prevent disabling all the administrator accounts.
Disabled user accounts can not login.
The account
is disabled: Whether to disable the selected user account. This
setting is grayed out for built-in accounts, and for the current
user, in order to prevent disabling all the administrator accounts.
Disabled user accounts can not login.
![]() The account
is locked out: This setting is checked if a user account is
locked out. You can not lock out an account, but you can unlock a
previously locked one.
The account
is locked out: This setting is checked if a user account is
locked out. You can not lock out an account, but you can unlock a
previously locked one.
![]() Password
can not be changed: Whether this user can change its own
password or not.
Password
can not be changed: Whether this user can change its own
password or not.
![]() Password is
not required: Whether a password is not required to impersonate this
user. We recommend unchecking this option for normal user accounts.
Password is
not required: Whether a password is not required to impersonate this
user. We recommend unchecking this option for normal user accounts.
![]() Password
never expires: Whether the password for this user has an expiry
date and time.
Password
never expires: Whether the password for this user has an expiry
date and time.
![]() Password is
expired: This setting is checked if the password for the
selected user is expired. You can not set this flag, but you can
unset it if it has previously been set.
Password is
expired: This setting is checked if the password for the
selected user is expired. You can not set this flag, but you can
unset it if it has previously been set.
![]() Auto-logon
this user: Automatically log this user on when the computer boots
up. Only one user can be automatically logged on. You will be
promped to enter the auto-logon password for this user account. The
password will be securelly saved as an LSA secret, just like the
advanced users manager (control userpasswords2) does.
Auto-logon
this user: Automatically log this user on when the computer boots
up. Only one user can be automatically logged on. You will be
promped to enter the auto-logon password for this user account. The
password will be securelly saved as an LSA secret, just like the
advanced users manager (control userpasswords2) does.
![]() Remove this
user from the welcome screen: If you check this option, the selected
user account will be removed from the welcome screen, and will not
be able to login interactively. Un-check it again to restore the
user's visibility and login ability.
Remove this
user from the welcome screen: If you check this option, the selected
user account will be removed from the welcome screen, and will not
be able to login interactively. Un-check it again to restore the
user's visibility and login ability.
After you select the desired settings, you need to press Save changes to apply them, and confirm. If you're setting up the auto-logon, you'll have to enter a password, which must correspond to the password currently assigned to the selected user account. Can be an empty password.
A message box will tell you whether the selected settings were successfully applied, and the fields will be updated to reflect the changes made.
Changing a user account's picture
If you want to change the picture associated with the selected user account, press the Change picture button. You will be presented with a dialog box similar to the screenshot below.
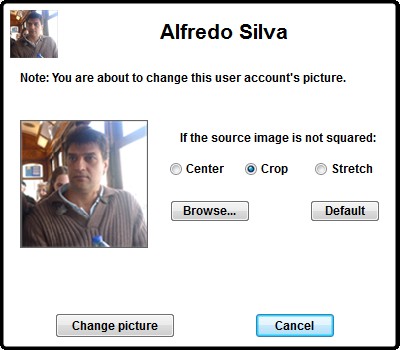
![]() Press the
Browse button to select a new image using the Windows Shell.
Press the
Browse button to select a new image using the Windows Shell.
![]() Because the
source image may not be squared, you can use the Center,
Crop and Stretch radio buttons to adjust the way the
picture is resized to fill the user tile's square. The preview
picture will be updated to reflect the selected option.
Because the
source image may not be squared, you can use the Center,
Crop and Stretch radio buttons to adjust the way the
picture is resized to fill the user tile's square. The preview
picture will be updated to reflect the selected option.
![]() To restore the
original image in the preview picture, press Default.
To restore the
original image in the preview picture, press Default.
![]() Press
Change picture to associate the selected picture to the user
account.
Press
Change picture to associate the selected picture to the user
account.
![]() Or press
Cancel to keep using the current picture.
Or press
Cancel to keep using the current picture.
Note: This feature may not work properly on Windows 8/8.1, because changing the user tile is only available for Microsoft accounts. Quick user manager successfully changes the user tile, but it is not displayed in the Start/Welcome screen. You don't have any option to set the user tile's picture in the User accounts control panel applet either. Let's hope the new Windows 10 will remove this limitation.
Setting a user account's password
Quick user manager allows you to easily change the password for any user account. Just press the Set password button. You'll be presented with a dialog box similar to the screenshot below.
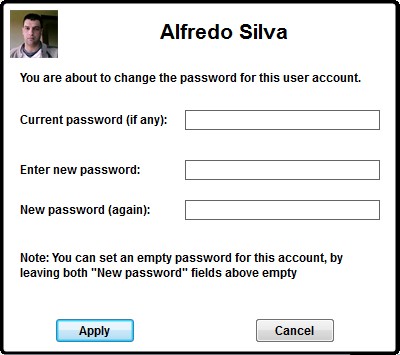
![]() Enter the
current password for the selected user in the Current password
(if any): field, or leave this field blank if the selected
account does not have any password set.
Enter the
current password for the selected user in the Current password
(if any): field, or leave this field blank if the selected
account does not have any password set.
![]() Enter the new
password in the Enter new password: field, or leave this
field blank if you want to remove the password for this user
account.
Enter the new
password in the Enter new password: field, or leave this
field blank if you want to remove the password for this user
account.
![]() Enter the same
new password in the New password (again): field.
Enter the same
new password in the New password (again): field.
![]() Press the
Apply button to apply the new password.
Press the
Apply button to apply the new password.
![]() Or press the
Cancel button to keep using the current password.
Or press the
Cancel button to keep using the current password.
Removing a user account's password
Important: This feature is provided only to allow administrators to recover user accounts whose passwords have been lost. If you use this feature, any EFS encryped files, personal certificates and stored passwords for the selected account will be lost. You should always use the Set password feature instead, unless you do not know the user account's password.
To remove a user account's password, press the Remove password button, and confirm by pressing Yes, in the confirmation dialog box.
Deleting a user account
If you want to remove a user account, select the user you want to delete in the list and press Delete user account. You will be presented with a dialog box similar to the one in the picture below.
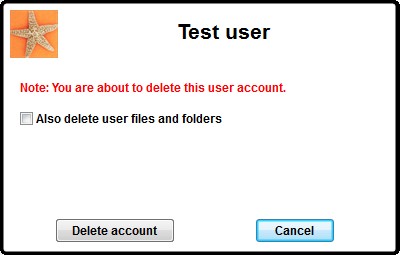
Note: After removing a user account, you will no longer be able to login using the deleted user account. Please consider creating a registry backup and a user profile backup before using this feature.
![]() Check Also
delete user files and folders if you want to permanently remove
all the files in the user's profile directory and also the profile
directory itself. If you do not check
this option, the user account will be deleted but the associated
files will remain in the hard drive. Note that you can disable the
user account instead.
Check Also
delete user files and folders if you want to permanently remove
all the files in the user's profile directory and also the profile
directory itself. If you do not check
this option, the user account will be deleted but the associated
files will remain in the hard drive. Note that you can disable the
user account instead.
![]() Press the
Delete account button to start removing the user account.
Press the
Delete account button to start removing the user account.
![]() Or press the
Cancel button to cancel the removal operation.
Or press the
Cancel button to cancel the removal operation.
Creating a new user account
Quick user manager provides you with a straight way of creating a user account, setting its password and picture simmultaneously. Just press the Create user account button. You'll be presented with a dialog box similar to the one in the screenshot below.
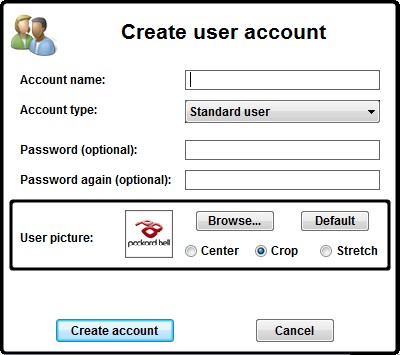
![]() Enter the
desired user name int the Account name field. User names can
not have any of the following characters: "/ \ [ ] : | < > + = ; ?
*,
Enter the
desired user name int the Account name field. User names can
not have any of the following characters: "/ \ [ ] : | < > + = ; ?
*,
User account names also can not end up with a period. If
you need to use one of those charactes in the account name, you will
be able to set them in the User display name field of Quick user manager's
main interface.
![]() You can
optionally set the password for the new user account in the
Password (optional), and Password again (optional)
fields.
You can
optionally set the password for the new user account in the
Password (optional), and Password again (optional)
fields.
![]() Additionally,
you can set the picture associated with the new user account using the
controls in the User picture group. For more info on how to
use those controls, see Changing a user account's picture.
Additionally,
you can set the picture associated with the new user account using the
controls in the User picture group. For more info on how to
use those controls, see Changing a user account's picture.
![]() When ready,
press the Create account button to start creating your new
user account.
When ready,
press the Create account button to start creating your new
user account.
![]() Or press the
Cancel button to cancel the user creation operation.
Or press the
Cancel button to cancel the user creation operation.
Top pane options
![]() Press the
Online help (F1) link to whenever you want to come back to this
help page.
Press the
Online help (F1) link to whenever you want to come back to this
help page.
![]() Press the Refresh list (F5) link to update the users list.
Press the Refresh list (F5) link to update the users list.
![]() Press the Home link to return to the Home section.
Press the Home link to return to the Home section.
