
UVK help - Delete file or folder


You can access the Delete or replace files and folders module by clicking Delete files and folders, in the Home section.
Help content index:
Overview of UVK's file deletion module
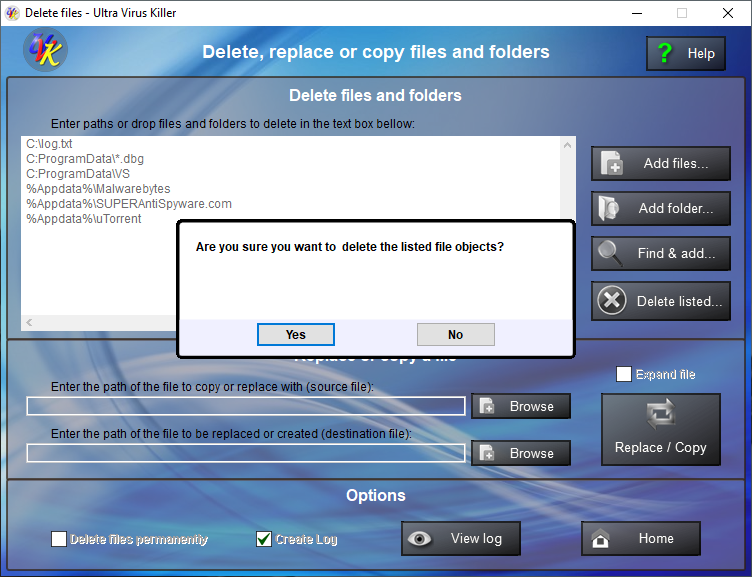
This feature allows you to force the removal of stubborn (or not) file objects. You can use it to delete both files and folders.
You can manually type or paste the path of the file object you wish to delete in the text box and press Enter to insert a new line.
UVK lets you use any of the suported environment variables to simplify writing common paths.
You can also drag and drop the file objects directly from the Windows Explorer to the text box.
Wild cards (* or ?) are supprted for both file and folder names. i.e. to delete all text files in C:, just enter C:\*.txt.
To add files to the list, click Add files... and browse to the folder that contains the files you want to delete.
In this case, you can select several files by holding the CTRL key down while clicking the files or using your mouse to create the selection. You can select only files, not folders. Click Open to add the selected files to the list.
To add a folder, click Add folder... and browse to the folder you want to delete, click to select it and click OK. The selected folder will be added to the list.
A line break for each inserted object will be automaticallye prepended.
If you want to perform a scan for specific files/folders in a custom location and add the desired results to the removal list, just press Find & add. More info below.
Check Delete files permanently if you want the items to be permanently removed instead of being sent to the recycle bin.
When the list is complete, click Delete listed. A progress bar will show you the deletion's progress.
Find and add...
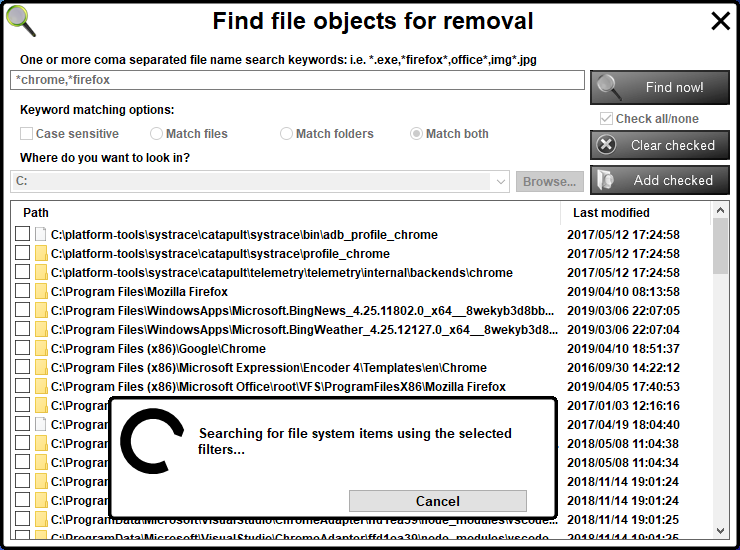
This feature, introduced in UVK version 10.11.4, allows you to quickly search for file objects in a specific location, using a multiple keyword criteria, and add the desired results to the removal list.
In the Delete files and folders' main window, press the Find and add... button. A dialog box similar to the one in the picture below will show up.
Enter the search keywords:
First you will need to enter the search keywords in the top input field. You can search for several keywords in the same operation, thus saving you lots of time. For instance, in the screenshot above we entered "*chrome,*firefox", which allowed us to search for files and folders whose names end on either "chrome" or "firefox".
As you probably already figured, you can use wild cards (* or ?). An asterisk (*) maches any character, any number of times. A question mark (?) matches any character one time or zero times For example:
IMG*.JPG matches IMG.JPG and IMG1.JPG and also IMG1F3C2D.JPG (or any other file name starting with IMG and ending with .JPG.
IMG?.jpg matches IMG.jpg and IMG1.jpg but not IMG12.jpg nor IMG1F3C2D.jpg. ? matches one character or zero.
You can use several jokers in the same keyword. For example:
*IMG*.JPG matches any JPG file containing IMG in the file name.
*GOOGLE* matches any file/folder whose name contains GOOGLE.
Select the desired keyword matching options:
If you want the keyword matching to be case sensitive, tick the Case sensitive checkbox.
T«Use the Match files, Match folders and Match both radio buttons to control whether to match only files, only folders, or match both files and folders. The scan will recursively search sub-folders regardless of which matching option you choose.
Indicate the scan's root directory and start the search operation.
Select the root directory from the dropdown list. If the desired directory is not listed there, you can manually type it or you can press the Browse button to locate it using the Windows Shell.
Press the Find now button to begin the scan and wait until it finishes. You can stop the scan anytime by clicking the Cancel button in the progress dialog box that is displayed while scanning.
Add the desired items to the removal list.
Once the scan finishes, select the items you want to remove in the list by ticking the checkboxes next to them. You can make use of the Check all/none checkbox to quickly tick all the items, or none.
If you want to remove the selected items from this list, press Clear checked.
Otherwise, if you want to add the selected items to the removal list, press Add checked.
When you're done with this feature, close this dialog box by pressing th x button in the top right corner.
File signature verification/p>
UVK always checks files digital signatures before deleting them. For files digitally signed by Microsoft, a message box will show up like the picture below:
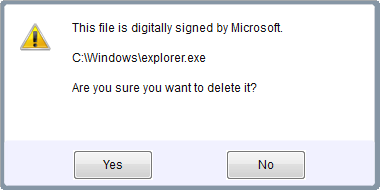
When you see this message, you should always click No, unless you know exactly what you're doing. We won't be responsible if you delete important system files.
If Dont recycle is not selected, the deleted files and folders are moved to the recycle bin, to allow its recovery in case of mistake. Those that can't be immediately deleted are scheduled for removal on next reboot.
If Create log is checked, a report of the deletions will be created, and you'll be able to see what's been deleted, ignored or scheduled to delete on reboot by clicking View log.
Replace or copy a file
In this section you can replace a file with another file. Since the file to be replaced doesn't have to exist, you can also use this feature to copy a file. The file will be replaced/copied with administrator privileges.
First you will have to enter the path or browse to the file that is going to replace the second file (the source file). Then you enter or browse to the path of the file to be replaced or created (the destination file).
If the file you want to copy is compressed, check Expand file, and UVK will decompress the destination file. This may be useful to copy files from the dllcache folder, on Windows xp, or other similar cases where the source files are compressed. Note that this only works for files compressed with ntfs compression, not zip compression.
Select the desired options on the lower pane. When ready, click Replace / Copy. A message box will tell you if the file was successfully replaced, or scheduled for replacement on reboot.
Lower pane options:
![]() Don't recycle: If this option is not selected, the
replaced/deleted items will be moved to the recycle bin. This will allow to recover them later, but reduces
largely the chances of success of the operation.
Don't recycle: If this option is not selected, the
replaced/deleted items will be moved to the recycle bin. This will allow to recover them later, but reduces
largely the chances of success of the operation.
If you want to replace system files like shell32.dll, kernel32.dll, csrss.exe or svchost.exe, you will never be able to do it without checking this option.
But if you do check this option, you will be able to replace these files even without rebooting the computer. However, the new files will only be loaded after rebooting, of course.
When selecting this option, a dialog box will be displayed like the picture below:
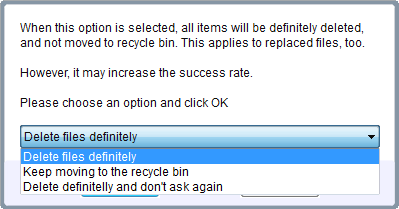
Choose the desired option, as shown in the picture and click OK. If you choose Delete definitely and don't ask again, this dialog will not be displayed again.
![]() Create log: Leave this box checked if you want UVK to create a
report of the replacement, where you'll be able to check if the file
has been successfully replaced.
Create log: Leave this box checked if you want UVK to create a
report of the replacement, where you'll be able to check if the file
has been successfully replaced.
![]() To
return to the main menu, click Home
or press Esc.
To
return to the main menu, click Home
or press Esc.
