
UVK help - Autorun manager


This section can be accessed by pressing Autorun manager, in the Home section.
Content index:
Choosing which entries to display in the list
Sorting the autorun entries list
Getting information about an autorun entry and destination file
Deleting an autorun entry and destination file (if desired)
Restoring previously deleted autorun entries
Choosing which entries to display in the list:
You can choose to hide the system protected files, all Microsoft files, or all signed files from the list by pressing the List settings button.
It will open a dialog box similar to the one in the picture below:
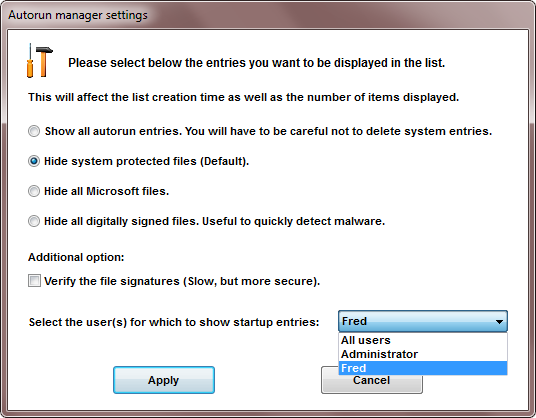
Select the option corresponding to the desired filter.
If you
select Show all autorun entries, then all the entries will be shown.
However, UVK will not allow you to delete system protected
files. You will still need to be careful not to delete system
entries.
If you select Hide system protected files
(Default), then only the non protected files will be
displayed.
If you select Hide all Microsoft files, then no
Microsoft files will be shown.
If you select Hide all
digitally signed files, then UVK will verify the digital of all
files and display only the unsigned ones.
If you use the second or third option, and you suspect that the system or Microsoft files have been infected or replaced, check the aditional option Verify the file signatures. This will ensure only genuine files are hidden from the list.
Choose the user you wish to display autorun entries from, in the drop-down box in the lower right corne of the dialog box. Alternately you can choose All users, which will make UVK display autorun entries from all local users.
Creating new startup entries
To create a new startup entry, press the Create / Restore button, in the upper pane. A dialog box like the one in the picture below will be displayed:
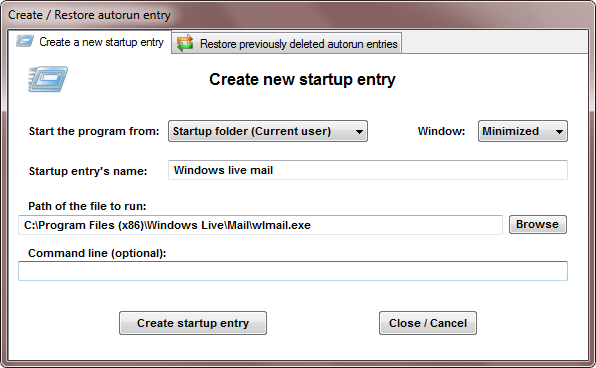
The Create a new startup entry tab is selected by default.
The example above shows how to create a startup entry that runs Windows live mail minimized at user logon.
Select the location from which your program will be started.
If you select Registry (Current user), or Startup folder (current user) then the program will be started when the current user logs in.
If you select Registry (All users) or Startup folder (All users), then it will be started when any user logs in.
Also, if you select Startup folder (current user) or Startup folder (All users), you will be able to choose whether the program will be started maximized, minimized or in a normal window.
Enter the name for your startup entry in the Startup entry's name input box. If you choose a name that already exists, you will be prompted to overwrite it.
Enter the path of the file to be executed in the Path of the file to run input box, or use the Browse button to serch the file using the Windows explorer.
Enter the optional command line parameters in the Command line (optional) input box. You may leave this field empty if your startup entry does not use command line parameters.
When you're all set, press the Create startup entry button. If the new startup entry is successfully created, the list will be updated to reflect the changes.
Press the Close / Cancel button, if you want to cancel the creation of the startup entry and close this dialog box.
Sorting the autorun entries list
The autoruns list can be sorted by pressing the column header buttons. The items will be sorted in ascending/descending order.
This feature is not availble on Windows Xp, because sorting listview items inside groups is not supported.
Selecting the autorun entries
Click the line corresponding to the autorun entry you want to manage. Right-click it to open the menu.
Alternately you can just double-click the line, or press Ctrl+Enter to open the Autorun Entry Properties window or use any of the hotkey combinations shown in the context menu.
You can select several lines at once by holding the Ctrl key down while clicking the lines. When several lines are selected, the action you choose will be performed to all the valid selected lines.
Getting information about an autorun entry and destination file:
Press Autorun Entry Properties in the upper pane or in the menu (Ctrl+Enter) to get more information about the selected autorun entry.
A small window will popup like the picture below, with several fields containing the autorun entry's name, the registry key where it is located, the full path of the file to run, the command line used to run it, its description, digital signature, MD5 hash and size..

Press the Google button in the Autorun entry name line to perform a google search using the entry's name as the keyword.
Press the Go button in the Location line to open the registry editor on the corresponding registry key, which is also written in the field to the left of the button. For entries on the startup folder, this will open the Windows explorer on the startup folder and select the corresponding file.
Press the Go button in the Image path line to open the location of the autorun entry's file.
Press the Google button in the File description line to perform a google search using the file description as the keyword.
Press File properties to open the selected file's properties dialog.
Press VirusTotal report to get a VT report of the selected file.
Press Google file name to perform a google search using the file name as the keyword.
You can get even more information on the files by clicking the buttons on the context menu, which we will explain later on this page.
Deleting an autorun entry and destination file (if desired):
To delete an autorun entry without deleting the destination file click the Delete entry menu button or just press Del. You can also press Delete Entry, in the upper pane, but make sure that Also delete file is unchecked or the file will be deleted!
To delete an entry and the destination file click the Delete Entry and file menu or press Ctrl+Del. Alternately, you can check Also delete file and press Delete Entry, in the upper pane.
Deleted files are moved to the recycle bin, so if you make a mistake, you can always restore them from there. Also, before deleting an autorun entry, UVK creates a backup, so you can restore it later.
If UVK doesn't manage to delete a file immediately, the access to the file will be blocked, and it will be deleted on the next system reboot. A message box will prompt you to reboot immediately or manually later.
Before deleting a file, UVK always checks its signature, and if you're about to delete a file digitally signed by Microsoft, a message box will popup as shown in the image below. However, if the file is a genuine system protected file, you will not be allowed to delete it.
This security feature is intended to prevent deleting system files by mistake, so when you got this message, you should click No, unless you know exactly what you're doing.
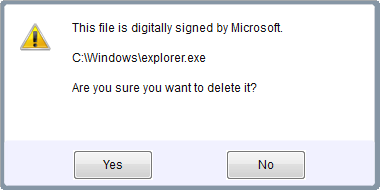
This software was created to delete virus, not system files, so, in a case like this one, if you click Yes, you're at your own risk. We won't be responsible for what may happen to your computer.
Restoring previously deleted autorun entries:
UVK allows you to restore autorun entries you have previously deleted. To do so, press the Create / Restore button, in the upper pane, and select the Restore previously deleted autorun entries tab.
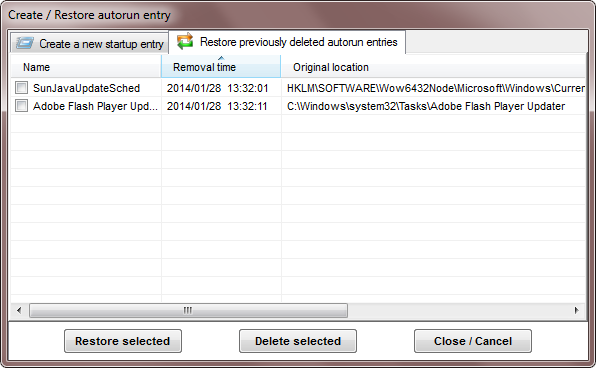
You can restore several entries at once. Just tick the checkboxes next to the ones you want to restore, press Restore selected, and confirm.
If you want to permanently delete some or all of the backed up autorun entries, tick the checkboxes next to the ones you want to delete, press Delete selected, and confirm. Note that you will not be able to restore these entries anymore.
When you're done, press Close / Cancel to return to the Autorun manager.
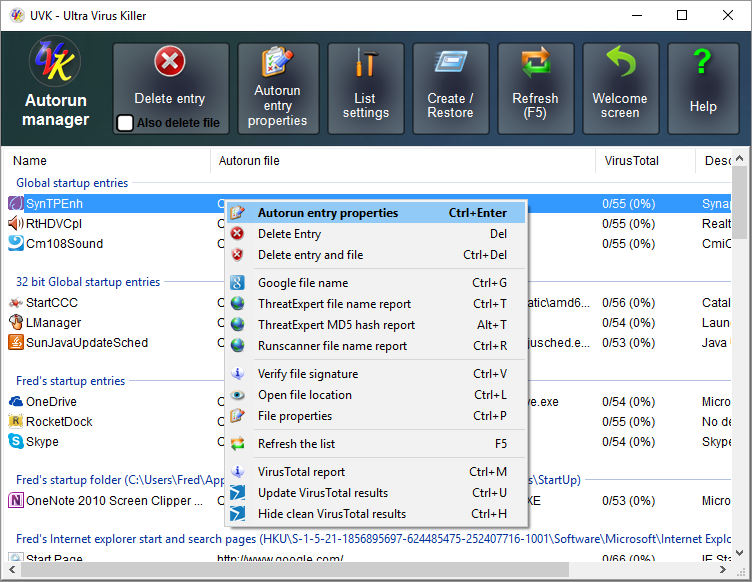
Right click context menu:
To get more information about an autorun entry, right-click the corresponding line.
A menu with several
options will be displayed: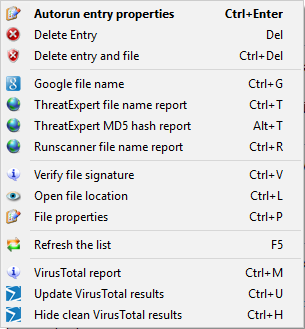
Google file name (Ctrl+G):
Makes a quick google search using the file name.
ThreatExpert file name report (Alt+T) or
ThreatExpert MD5 hash report:
ThreatExpert has an
excelent malware info database. If the selected file is present in
this database, you can get information on which files it creates,
which registry entries it changes, etc.
Runscanner file name report (Ctrl+R):
If the file name exists in this database, you'll get a detailed
description of the file and the possible signers and paths.
Open File Location
(Ctrl+L)
This option will open an Explorer window on the path where the
autorun entry's file is located and select it.
File Properties
(Ctrl+P)
Clicking this menu item will open the autorun entry's file
properties dialog box, allowing you to get more information about
it.
VirusTotal report (Ctrl+M):
Get the VirusTotal report of the selected
file(s).
Update VirusTotal results (Ctrl+U):
Update the results
in the VirusTotal column.
Hide clean VirusTotal results (Ctrl+H):
Delete any
items with clean VirusTotal results from the list.
Refresh the list or exit the section:
To refresh the list, click Refresh on the upper pane or on the context menu, or just press F5.
To return to the main menu click Home or press Esc.
