
S.O.S. Security Suite - Threat Scan


S.O.S. Security Suite's Threat scan lets you easily remove adware, spyware and all types of malware, optionally for all users in a system. This module also helps you to speedup your computer and free up resources by removing pottentially unwanted programs and autorun entries. With S.O.S.'s threat scan you can also repair damage caused by malware infection.
Threat Scanner is also the only application of this type that supports nearly all Internet browsers, not just the main ones.it removes browser toolbars, ad-ons, plugins, unwanted search providers and hijacked home pages, potentially unwanted programs (PUP's), and also rogues, trojans, rootkits, ransomware and all other forms of malware. It also lets you optionally reset the browser settings, allowing them to run as smoothly as when they were installed. Click here for more info.
Most well known browsers are supported (Chrome, Edge, Firefox, IE). Support for other Chromium and Firefox based brosers was added in version 10.4 and 10.5. Opera, Avast Secure Browser, cCleaner Browser, Brave, Chromium, Tor Browser, Waterfox, Netscape and Thunderbird and many others are now supported, at least partially.
You can start a threat scan from the Dashboard or from the Threat Scan module.
In this page:
Overview Scanning for threats Whitelist Pre-removal actions Threat removal Application logs Scan options
Overview
S.O.S. Security Suite's Threat scanner is a powerful adware and malware remover for Windows, which has the ability to scan all the users in a system. This can save you lots of time logging in to other user accounts and performing the scan again.
The threat scanner removes browser toolbars, ad-ons, plugins, unwanted search providers and hijacked home pages, potentially unwanted programs (PUP's), and also rogues, trojans, rootkits, ransomware and all other forms of malware.
The scan can be automatically executed os a schedule basis. You can easily configure this schedule from the Settings module.
Once you perform one or more threat scans, S.O.S. Security Suite will display how long it was, in the Dashboard, from where you can quickly start a new threat scan with the same settings as the last one.
All scan settings can be changed in both S.O.S. Security Suite and the Threat scanner itself.
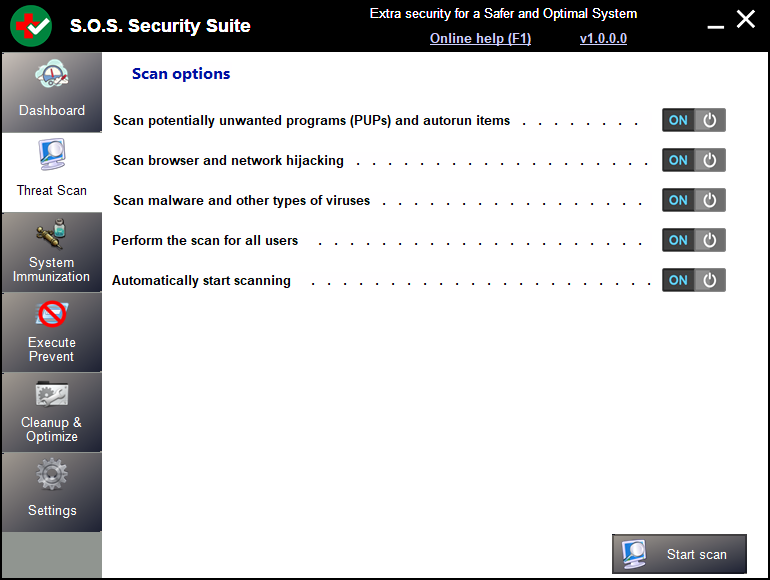
Scanning for threats
The threat scanner is launched from S.O.S.'s Threat scan module, which is shown in the picture above. Start by turning on:off the desired scan options by clicking the switch buttons.
The options are self explanatory, except for the last one (Automatically start scanning) which may not be that obvious. In fact, when this option is disabled the threat scanner will not start the scan automatically. Instead it will wait for you to click the Scan button.
You can also start a scan fro the Dashboard module. In this case, the same options you selected the last scan will be automatically selected.
One you are in the Threat scanner interface, you can start a scan by pressing the Scan button. The threat scan begins and the Scan button becomes the Stop button, letting you to cancel the scan anytime.
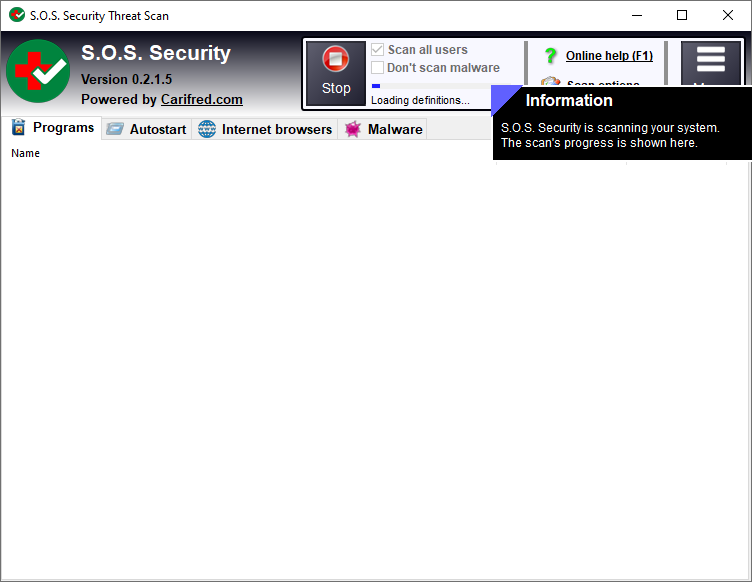
The whole scan usually only takes a few minutes, or a few seconds, if you choose not to scan malware.
If you want to scan only the current user, uncheck Scan all users, before starting the scan. The SYSTEM user account will always be scanned, though.
The progress bar to the right the Scan button will tell you the scan's progress, and a text label below the progress bar will tell you which section is currently being scanned.
While the scan is being performed, you can have a look the the items already found. Double-clicking an item automatically takes you to its location in the registry. You can also jump to the item's location in the file system, when available, by right-clicking the item's line and selecting Open file location. This allows you to have a better insight of the item, and decide whether you want to remove it or not.
Tip: To save time, while the scan is being processed, uncheck any items you don't want to remove, or whitelist items you don't want to be displayed in future scans. More info on the whitelist below.
You can quickly check/unckeck all items in the list: right-click the list to open it's context menu, and then select Check all, or Check none, respectively. The context menu also has a Open registry location menu item which will perform the same action as double-clicking the list item, as mentioned above.
When the scan is complete you will be presented with a message box telling you how many items were found, and you can access the scan's log by pressing the Menu button, and then selecting the View scan log menu item. This message box also asks you if you want the application to show a few instructive tips. If you're new to the game and want to learn fast, click Yes and watch while S.O.S. shows you how to use the application. Otherwise, choose No.
Performing a custom malware scan
S.O.S. Security Suite version 1.3 or higher lets you scan any directory or files for malware. In order to bring up the Custom Scan dialog box, just click the 'three bar' Menu icon and then select Custom Scan. A window simiar to the screenshot below will be displayed.
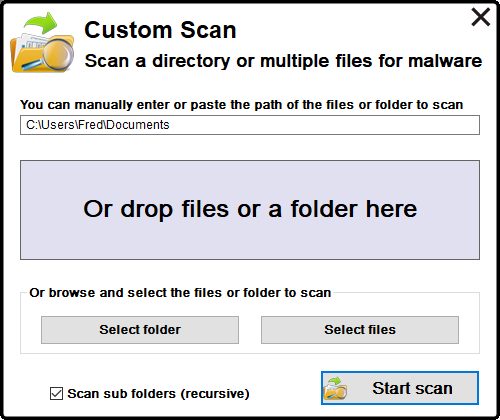
This dislog box is easy to use. You have several options to select the desired file objects to scan:
- By manually entering the path of the diectory or file to scan in the text input field at the top of the dialog box.
- by dropping files or a folder in the drop box at the center of the dialog box.
- By clicking Select folder or and then browsing to the desired folder and selecting it.
- By clicking Select file and then browsing to the location of the desired files to scan and selecting them.
If you select a directory, a checkbox named Scan sub folders (recursive) is shown. un tick this check box if you want to scan only the root of the directory and skip sub directories.
Once you select the directory or files to scan, press the Start scan button. The scan's progress will be shown at the top of the main window, just like the regular scan.
Any infections will be shown in the Malware tab and can be selected and removed as in the regular scan.
Whitelist
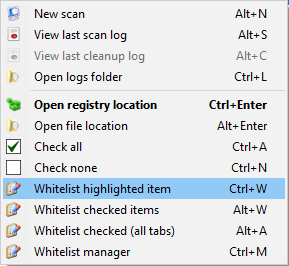
As mentioned above, you can whitelist any of the items in the list, after a scan is complete, or even during the scan.
To whitelist one or several items, right-click an item in one of the lists, or press the menu button. Then, select one of the following items from the displayed menu similar to the picture below:
Whitelist highlighted item (Ctrl+W) - Whielist the selected item, the one that is highlighted in the list.
Whitelist checked items (Alt+W) - Whitelist all the items that are checked in the current list.
Whitelist checked (all tabs) (Alt+A) - Whitelist all the checked items in all tabs.
Note: the text to the right of each menu item corresponds ot the keboard hotkey combinations you can use to perform the same action.
To manage S.O.S. Security's whitelist, press the Menu button, and select Whitelist manager. You will be presented with a dialog box similar to the one in the picture below.
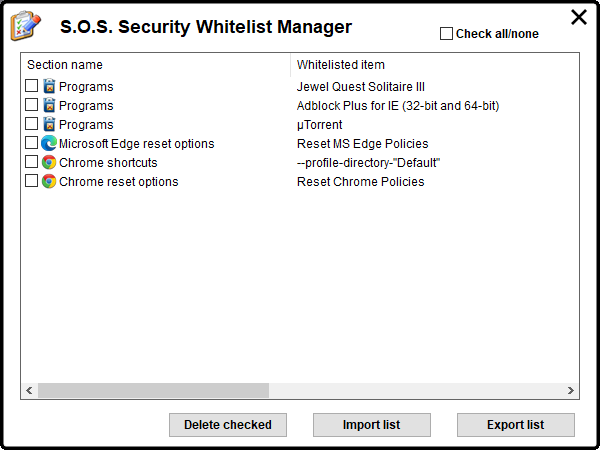
The list shows the whitelisted items. Thick the checkbox next to the items you want to remove from the list, press Delete checked and confirm. This removes the item(s) form the whitelist, meaning they will be detected again, when present.
You can easily export and import the whitelist to/from an external file. This will be particularly useful to make backup copies of the whitelist, or to transfer it to a different computer. To import the whitelist from a file, press Import list and select the INI file the list was previously exported to. To export the list, press Export list and select the INI file path and name you wish to export to.
When you are done using this feature, press Close / Cancel to close this dialog box.
Important note:
S.O.S. Security Suite checks for the presence of a file named S.O.S.Whitelist.ini, in the same directory as the application’s 64-bit executable. If that file exists, it will be used. You can still export:import the whitelist from:to any file.
Selecting the items to remove
Once the scan is complete, S.O.S.'s threat scanner displays a resumé of what was found. It is normal that it always finds many optional items. Those are mostly repair options available for you to use in case your system is still not working properly.
The same dialog box that shows the resumé also asks you if you want to see a few instructive tips. If you're not very familiar with S.O.S.'s threat scanner, click Yes, and pay attention while it shows you what you need to do to repair your computer.
Before removing the items found, you should set the check state of the items you want to remove, or ignore. Items will only be removed/fixed if the corresponding check box is ticked. S.O.S.'s threat scanner simplifies the selection process by providing only the names of the programs to remove, in the Programs list, and by spliting the browser repair options into several groups.
The threat scanner automatically checks most of the items during the scan. However, some items may not be checked by defaut, depending on their nature. You can check the desired items in just a few seconds.
Browser reset options and malware related fixes are usualy unchecked. You can manually check those options if removing the other items did not restore the desired functionality. Try removing the items selected by default once, if that does not fix your problem, check all the options and try again. That should get your browsers and your system working properly.
After selecting the desired items to remove or fix, you are ready to begin the removal process.
Deleting/fixing the selected items
Once the scan is complete, the Stop button becomes the Cleanup button and two more options become available ito the right of this button
- Create a system restore point - Enabes creating a restore point prior to the removal.
- Auto reboot if needed - The computer will automatically reboot after the removal process, so save all your work.
Once you select the desired items to fix and the desired options, press the Cleanup button to start removing or fixing the selected items.
Some of the selected items will be removed, but others will be fixed instead. For instance, hijacked browser shortcuts will be fixed, programs are always removed. S.O.S.'s threat scanner knows which items it must fix or delete, no action is required on your side.
If the Create restore point check box is ticked, a system restore point is created before the removal process.
File system objects that S.O.S.'s threat scanner does not manage to remove immediately are scheduled for removal on reboot. In this case, Unless automatically reboot if needed is enabled, the threat scanner will ask you if you want to reboot immediately. You can choose No, if you want to manually reboot later.
Once the removal process is complete, you can read the removal log by pressing the Menu button and then selecting the View removal log menu item.
Application logs
You can access the scan and removal logs by pressing the Menu button and then selecting View scan log, or View removal log. Obviously, the scan log is only available after you complete a scan, and the removal log is only available after you remove the selected items.
If you want to access logs of previous scans or removals, select Open logs folder, instead, and manually open the desired log. Application log names are timestamp based, meaning the higher the number in the log's file name, the more recently the log was created. The Windows file explorer should automatically sort them in the correct order, from the oldest to the newest.
The logs are very self-explanatory. The scan log contains a header with some useful system information, such as the Windows version, installed browsers' versions, and the name of the user that started Ultra Adware Killer. This information may help you to detect an outdated browser, or a missing service pack.
Items found (in the scan log) or items removed (in the removal log) are ordered by the corresponding section: Programs, Internet Explorer, Chrome and Firefox.
Registry related items are prefixed in a special way, that makes it easier to identify the corresponding registry key, and also shortens the line's text:
@UserName: A registry key located in the UserName's
registry portion (hive).
HKLM64: A registry key located in
the 64 bit portion of the HKEY_LOCAL_MACHINE key, in 64 bits Windows
versions.
HKLM32: A registry key located in the 32 bit
portion of the HKEY_LOCAL_MACHINE key, in 64 bits Windows versions.
HKCR64: A registry key located in the 64 bit portion of the
HKEY_CLASSES_ROOT key, in 64 bits Windows versions.
HKCR32:
A registry key located in the 32 bit portion of the
HKEY_CLASSES_ROOT key, in 64 bits Windows versions.
For 32 bits Windows versions, HKLM and HKCR are used instead. Specific value names or data parts to remove are specified in the lines below the key's line.
In the scan log, all reported items contain an extra line telling the item's check state when the scan completed.
Removal logs thell the result of the removal/repair operation for each item.
Scan options
You can fully customize your scan and removal process by clicking the Scan options link in the top pane. A dialog box similar to the picture below is displayed.
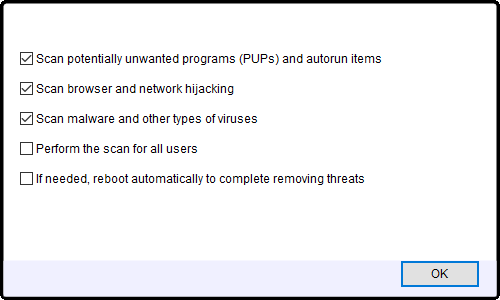
The available options are self explanatory. Tick the ones you want to enable, and uncheck the ones to disable.
