S.O.S. Security Suite - Execute Prevent


Click here to go to the Help index page.
The Execute Prevent S.O.S. feature provides you with an extra level of protection against viruses. It works by adding a few Software restriction policies directly to the Windows registry. On their turn, these policies prevent running files in specific directories, and optionally their sub directories. Click here to go to the Help index page.
Use this feature to prevent malware from running in your computer. But keep in mind that it may also block some genuine applications that use the same directories. That is why you should perfom a scan for the affected files and whitelist the ones you need before applying the policies. See the corresponding help section below for more information.
The Execute Prevent module displays four tabs:
Execute Prevent Settings Locked Items List Excluded Items List Affected Files Save and apply
For a deeper insight on how Execute Prevent works, check out the Overview section below.
Execute Prevent overview
The policies set by Execute prevent disallow running the different types of executable files (.exe, .com, .pif, etc.), command line scripts (.bat, .cmd), VB scripts (.vb), regedit scripts (.reg) and also shortcuts (.lnk).
Even if you have good malware/spyware protection software, you know you're not totally protected. New viruses are often ignored by anti-virus programs because they are not yet present in the virus signatures databases. Execute prevent ensures that if the viruses are not detected, at least they will not be executed.
Execute Prevent is easy to setup, can be kept enabled even S.O.S. is not running and doesn't use any system resources. Also, unlike other similar tools, Execute prevent creates very few policy keys. For instance, to immunize the whole user profile folder for all users (including sub directories), it creates less than 20 policy registry keys, including the exceptions' keys.
Malware usually hides itself in sub directories of the Application data folders, and also in other user related directories, sometimes it also hides in the Fonts folder (C.\Windows\Fonts) or in hidden sub directories of the recycle bin folder, because the Windows explorer will ot show their files there. Execute prevent has presets that automatically add the paths of those folders to the Locked items list, providing a very a quick setup. This way, even if you get infected, you're not really infected, because the infected files can not be executed.
So, now you may be thinking: But if those policies also block shortcuts, won't they block the ones in the Start menu and desktop folders?
That's when the exclusions come in. Excluded paths have priority over the locked ones, meaning you can lock a parent directory, including sub folders, and unlock the children folders and files you want. Execute prevent automatically adds exclusions for the folders where users usually have executable files and shortcuts, such as the Start menu and All programs folders. I also automatically excludes system related paths such as the temporary folders and the Internet Explorer's cache folder, ensuring you remain able to install/uninstall programs, or run downloaded files.
Take a good tour through this help page to fully understand how it works.
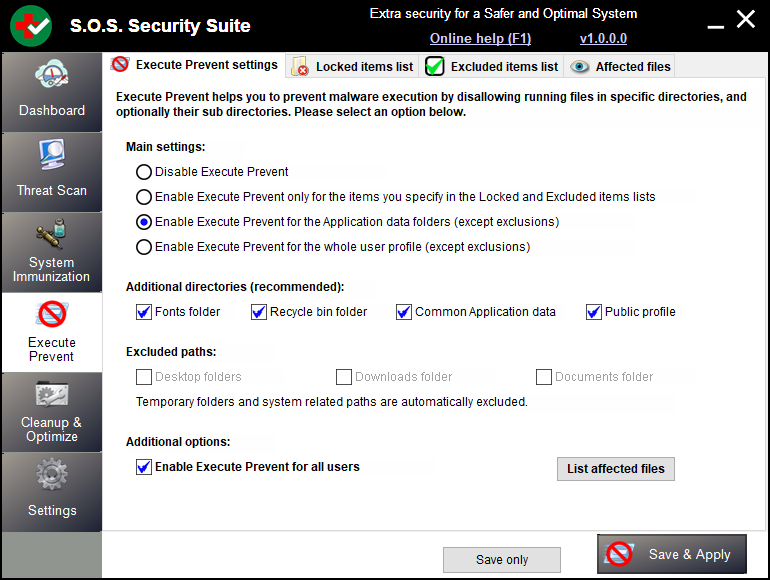
Execute Prevent Settings
To setup Execute prevent, all you really need to do is select the desired preset, in the Execute Prevent settings tab and press Save & Apply. This means you can setup Execute prevent with just a few clicks/taps. We still recommend that you also scan affected files to whitelist any programs you may use.
Below is the full description of each preset and option:
Main settings:
![]() Disable Execute prevent:
Remove all the policies. To quickly remove all locked and excluded
paths, just select this option and press Save & Apply.
Disable Execute prevent:
Remove all the policies. To quickly remove all locked and excluded
paths, just select this option and press Save & Apply.
![]() Enable Execute prevent
only for the paths you specify in the Locked and Excluded items
lists: Select this option if you want to define the paths to
lock and exclude yourself. Use the Locked
items list and Excluded items
list tabs to add the desired paths, and press Save &
Apply.
Enable Execute prevent
only for the paths you specify in the Locked and Excluded items
lists: Select this option if you want to define the paths to
lock and exclude yourself. Use the Locked
items list and Excluded items
list tabs to add the desired paths, and press Save &
Apply.
![]() Enable Execute prevent
for the Applicaton data folders: This option will disallow
running files in the Local and Roaming Application
data folders, and sub directories. If Enable Execute prevent for
all users is checked, the restrictions will be effective for all
users. Otherwise they will be applied only for the current user.
Commonly used folders are automatically excluded.
Enable Execute prevent
for the Applicaton data folders: This option will disallow
running files in the Local and Roaming Application
data folders, and sub directories. If Enable Execute prevent for
all users is checked, the restrictions will be effective for all
users. Otherwise they will be applied only for the current user.
Commonly used folders are automatically excluded.
![]() Enable Execute prevent
for the whole user profile: This option will disallow running
files in any folder belonging to the user profile. If Enable
Execute prevent for all users is checked, the restrictions will
be effective for all users. Otherwise they will be applied only for
the current user. Commonly used folders are automatically excluded.
Enable Execute prevent
for the whole user profile: This option will disallow running
files in any folder belonging to the user profile. If Enable
Execute prevent for all users is checked, the restrictions will
be effective for all users. Otherwise they will be applied only for
the current user. Commonly used folders are automatically excluded.
Additional directories (recommended):
![]() Fonts
folder: Restrict running files in the Fonts folder
(%Windir%\Fonts).
Fonts
folder: Restrict running files in the Fonts folder
(%Windir%\Fonts).
![]() Recycle bin
folder: Restrict running files in the recycle bin folder. Each
user is granted a recycle bin folder, which is a sub directory of
C:\Recycler, for XP, and C:\$Recycle.bin, for vista and
higher. If Enable Execute prevent for all users is checked,
the restrictions will be effective for all users.
Recycle bin
folder: Restrict running files in the recycle bin folder. Each
user is granted a recycle bin folder, which is a sub directory of
C:\Recycler, for XP, and C:\$Recycle.bin, for vista and
higher. If Enable Execute prevent for all users is checked,
the restrictions will be effective for all users.
![]() Common
Applicaton data: Restrict running files in the common
application data folder (usually C:\ProgramData).
Common
Applicaton data: Restrict running files in the common
application data folder (usually C:\ProgramData).
![]() Public
profile: Restrict running files in the public profile folder
folder (usually C:\Users\Public).
Public
profile: Restrict running files in the public profile folder
folder (usually C:\Users\Public).
Note: Important sub directories are automatically excluded, such as the Public desktop, and the Common Start menu folders.
Excluded paths:
![]() Desktop
folders: Allow running files in the User's desktop
folder (usually %USERPROFILE%\Desktop).
Desktop
folders: Allow running files in the User's desktop
folder (usually %USERPROFILE%\Desktop).
![]() Downloads
folder: Allow running files in the User's Downloads
folder (usually %USERPROFILE%\Downloads).
Downloads
folder: Allow running files in the User's Downloads
folder (usually %USERPROFILE%\Downloads).
![]() Documents
folder: Allow running files in the User's Documents
folder (usually %USERPROFILE%\Documents).
Documents
folder: Allow running files in the User's Documents
folder (usually %USERPROFILE%\Documents).
Note: These options will only be available for the "Enable Execute prevent for the whole user profile" preset. You don't need these policies for the other presets.
Additional options:
![]() Enable
Execute Prevent for all users: Select this option if you wish to
enable the selected preset for all users.
Enable
Execute Prevent for all users: Select this option if you wish to
enable the selected preset for all users.
Locked Items List
The paths corresponding to the selected preset are shown in the top group of the list, and can not be edited or deleted.
The paths you have eventually added are shown in the bottom group. You can add more paths to this group, and delete or edit the existing ones.
To add a file path path, press the Add file path button. To add a directory path, press the Add folder path button. To edit an existing path, select it in the list, and then press the Edit selected button. A small dialog box will be displayed, similar to the screenshot below, which will help you to setup the desired path.
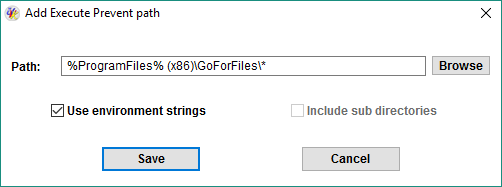
The picture above ilustrates how to add a path of a known malware folder. You can use this feature to prevent executing any malware you know where it resides. The path does not need to exist. Obviously you wouldn't want to block the root of system paths such as the Program files, or the Windows folders and all sub directories. Be careful with that. if you don't know which paths to add, just don't add any paths.
![]() Checking
Use environment strings will make the paths you define work for
all users, and in any system, so you may want to use this feature.
Checking
Use environment strings will make the paths you define work for
all users, and in any system, so you may want to use this feature.
![]() Check
Include sub directories if you want to disallow running files in
the selected folder and all its sub folders. Uncheck it if you only
want to block this folder and leave sub directories unlocked. This
option is not valid for file paths, obviously.
Check
Include sub directories if you want to disallow running files in
the selected folder and all its sub folders. Uncheck it if you only
want to block this folder and leave sub directories unlocked. This
option is not valid for file paths, obviously.
![]() When you have
correctly setup your new path, press Save. You can see your
new path in the Locked items list. Press Save & Apply
to add the new path(s) to the software restriction policies.
When you have
correctly setup your new path, press Save. You can see your
new path in the Locked items list. Press Save & Apply
to add the new path(s) to the software restriction policies.
![]() Press
Cancel if you wish to cancel the operation instead.
Press
Cancel if you wish to cancel the operation instead.
Excluded Items List
The Excluded items list shows the unresticted paths currently waiting to be applied. Remember: These are the paths where files CAN be inconditionally executed.
The paths corresponding to the selected preset are shown in the top group of the list, and can not be edited or deleted.
The paths you have eventually added are shown in the bottom group. You can add more paths to this group, and delete or edit the existing ones.
To add a file path path, press the Add file path button. To add a directory path, press the Add folder path button. To edit an existing path, select it in the list, and then press the Edit selected button. A small dialog box will be displayed, similar to the screenshot below, which will help you to setup the desired path.
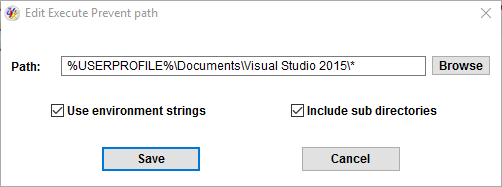
The picture above ilustrates how to add a path you may need to unlock if you use the Enable Execute prevent for the whole user profile preset. The path does not need to exist.
![]() Checking
Use environment strings will make the paths you define work for
all users, and in any system, so you may want to use this feature.
Checking
Use environment strings will make the paths you define work for
all users, and in any system, so you may want to use this feature.
![]() Check
Include sub directories if you want to allow running files in
the selected folder and all its sub folders. Uncheck it if you only
want to unlock this folder and leave sub directories untouched. This
option is not valid for file paths, obviously.
Check
Include sub directories if you want to allow running files in
the selected folder and all its sub folders. Uncheck it if you only
want to unlock this folder and leave sub directories untouched. This
option is not valid for file paths, obviously.
![]() When you have
correctly setup your new path, press Save. You can see your
new path in the Locked items list. Press Save & Apply
to add the new path(s) to the software restriction policies.
When you have
correctly setup your new path, press Save. You can see your
new path in the Locked items list. Press Save & Apply
to add the new path(s) to the software restriction policies.
![]() Press
Cancel if you wish to cancel the operation instead.
Press
Cancel if you wish to cancel the operation instead.
One esy way to add files to the exclusions list is to list the affected files, and then use the context menu options in that list to add paths to the exclusions.
Affected Files
Once you have configured your disallowed and unrestricted paths, you can check out which files will be blocked. To do so, press the List affected files button, in the Execute prevent settings tab, or the Scan button in the Affected files tab. Execute prevent will start searching your system for affected files.
When the scan is complete, Execute prevent's interface will look like the screenshot below.
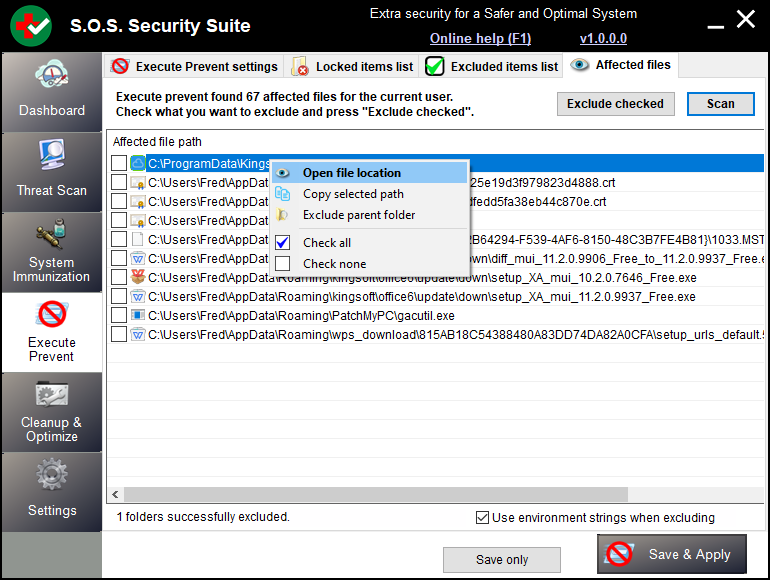
The list shows the files affected (blocked) by the currently selected preset and additional paths. If you want to exclude some of the paths, tick the corresponding check marks and press Exclude checked. This will automatically add the selected files to the exclusions list, meaning the selected files will be allowed to be executed.
You can also right-click the items in the list. A menu with four options will popup:
![]() Open
file location: Open the selected file's location in Windows
explorer. The same as simply double-clicking the item in the list.
Open
file location: Open the selected file's location in Windows
explorer. The same as simply double-clicking the item in the list.
![]() Copy
selected path: Copy the selected path to the clipboard. Useful,
for instance to add a part of that path to the exclusions list.
Copy
selected path: Copy the selected path to the clipboard. Useful,
for instance to add a part of that path to the exclusions list.
![]() Exclude parent folder: Clicking this menu item will add the
parent folder of the selected file to the exclusions list. Useful to
quickly unrestrict all files in a folder.
Exclude parent folder: Clicking this menu item will add the
parent folder of the selected file to the exclusions list. Useful to
quickly unrestrict all files in a folder.
![]() Check all: Check all the files in the list.
Check all: Check all the files in the list.
![]() Check none: Uncheck all the files in the list.
Check none: Uncheck all the files in the list.
The Use environment strings when excluding checkbox in the low status bar defines whether to use environment strings for the excluded paths. Using environment strings will make the new exclusions work for all users.
Once you have excluded all the desired items, press Close to return to the normal Execute prevent's interface.
Save and apply
Once you save your Execute Prevent settings and paths, you can save those settings for applying later, or save and apply them right away.
![]() Press Save
only if you wish to save your Execute Prevent settings
and paths, but you do not want to apply them immediately.
Press Save
only if you wish to save your Execute Prevent settings
and paths, but you do not want to apply them immediately.
![]() Press Save &
Apply if you wish to apply your Execute Prevent settings and
paths. All settings and paths are saved before they are applied.
Press Save &
Apply if you wish to apply your Execute Prevent settings and
paths. All settings and paths are saved before they are applied.
